Adding new inventory items
When recording new inventory records in GGCE, several requirements must be met:
- Each inventory must be linked directly to an accession. The accession, in turn, must reference a species that is accepted in the taxonomy table. (Accepted taxon is a required field for accessions. If you are recording a new accession item and only know the genus, you can use Genus spp. provisionally, and edit the accession and specify the exact species at a later stage).
- Each GGCE inventory number must be unique and composed of four fields: Inventory Prefix, Number, Suffix, and Type. The Inventory Type is selected from a pre-defined list to reflect the actual form of the inventory, such as SD (seed), PL (plant), and IV (in vitro material). Naming conventions for these fields may vary by organization but must remain unique within the system.
- Every inventory item must reference a policy name from a list of inventory maintenance policies. Therefore, ensure that you have an inventory policy selected when saving a new inventory item.
- Select a maintenance site from the available list of sites - these sites are typically managed by the GGCE database administrator. Begin typing in the field to display a list of sites.
- The availability status must be specified from one of the available options.
Acquisition
Most genebank operations in GGCE automatically generate new germplasm inventory records. The Acquisition tool is useful when you receive completely new material and need to add (in bulk) new (temporary) accessions and the corresponding inventory items. In effect this feature is a shortcut for adding multiple accessions and some of the data that they have in common. This is useful in situations such as the recording of accessions obtained on the same collection trip.
Importing names
The process can involve setting up an optional spreadsheet to import the names of the accessions that will be added in one batch.
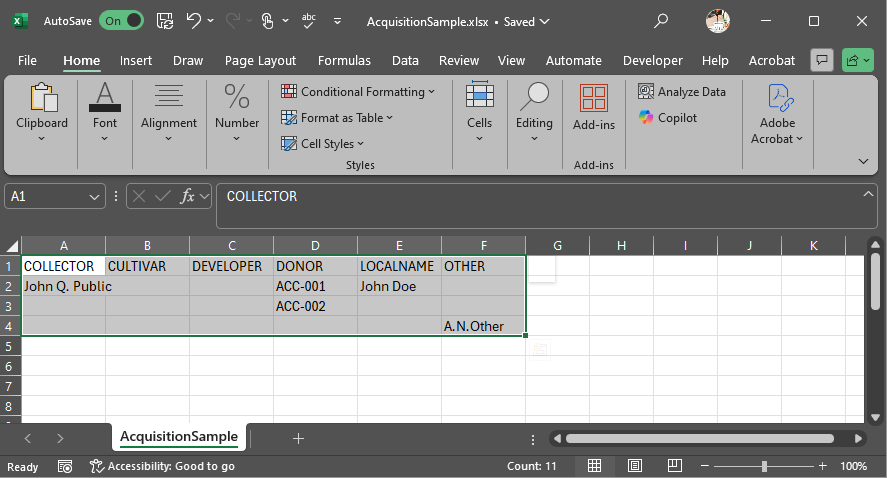
Prepare an Excel spreadsheet containing the different names for the incoming germplasm, each row representing one accession. Copy the contents of the spreadsheet and paste the result into the Paste accession names field. Only columns matching the ACCESSION_NAME_TYPE codes will be considered and the result will be displayed on the page.
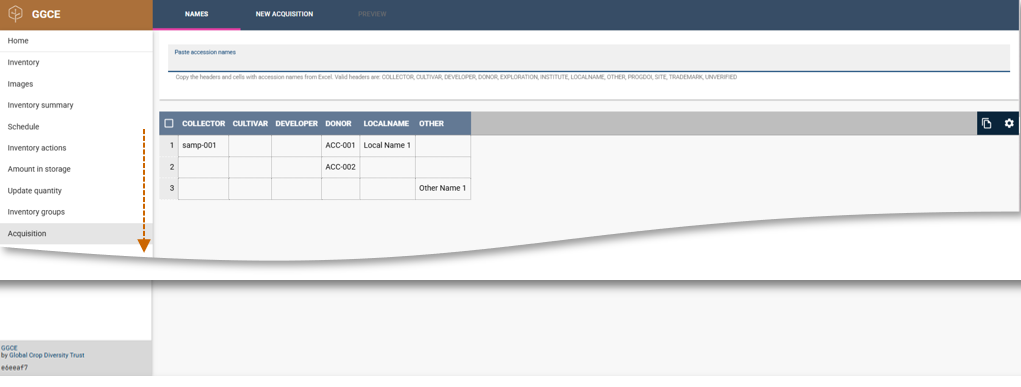
The displayed list corresponds to the pasted accession names. At this point the other accession data can be specified in the next step.
New acquisition
Click the New Acquisition tab on the banner to display the form. Shown here is an example of the form after it has been filled.
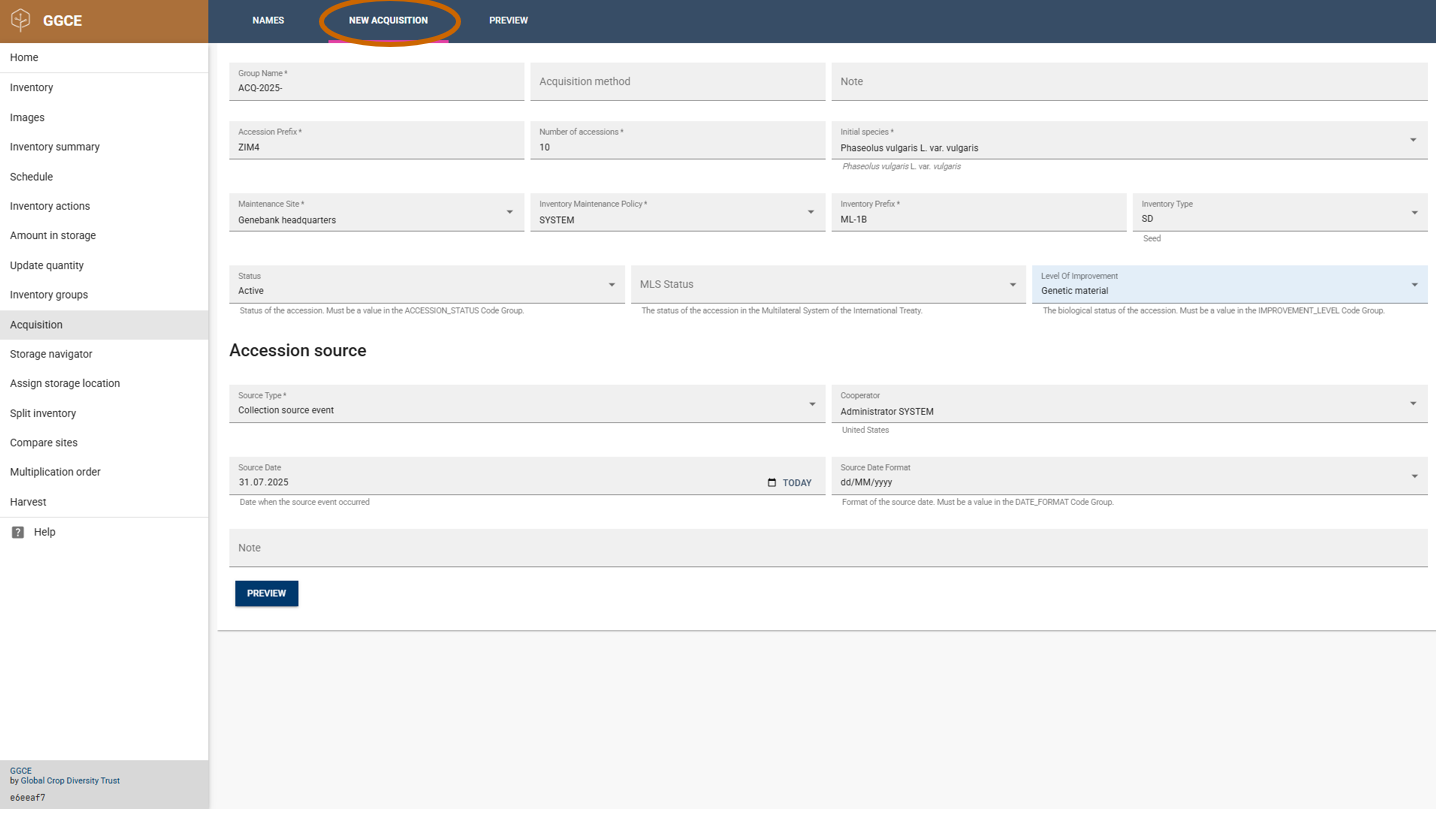
Group Name indicates to which inventory group all the added inventory items should belong. This field is required and can be used to identify an added batch of records.
Acquisition method is another controlled vocabulary type that is managed by users; it is a category that will be recorded with the group information.
Note can be used to add comments to the resulting records.
Accession Prefix will be the prefix of the accession number for all entries.
Number of Accessions is the number of accessions that will be added to the database. The default value is detected from the list of names pasted in the “Names” tab. This number can be changed: if you set it to a lower value, the exceeding items will be ignored, and if set to a higher number, additional accessions will be created without any name information.
Select an entry in Initial Species by typing part of the scientific name; the selected taxon will be assigned to all the samples.
The next four fields deal with the inventory information for all samples. Maintenance Site can be used to set the site that is responsible for the maintenance of the samples. Select the Inventory Management Policy that will apply to all samples. Inventory Prefix will be prepended to all inventory numbers and Inventory Type will record the type of all the inventory items; the type code will be appended to the inventory numbers.
The Accession source section can be used to set the source for all samples. Source Type indicates whether the samples were collected, developed or donated. The Source Date indicates when the samples were received. Note can be used to add comments and Cooperator indicates the source entity.
Click the Preview button to display the list. At this stage, permanent numbers have not yet been assigned, so the Preview window will display "-1" in place of these numbers.
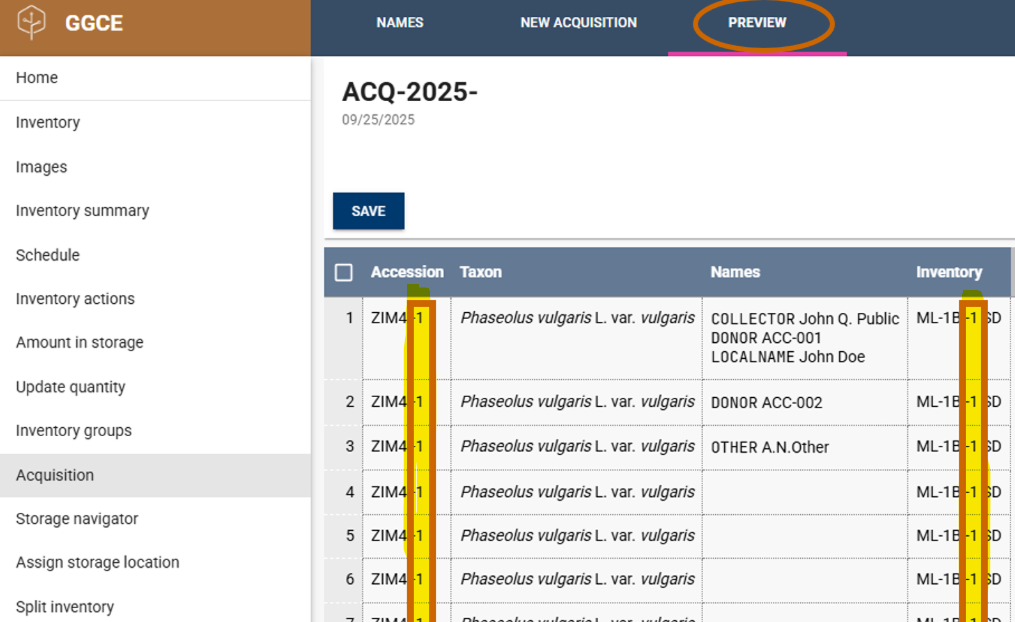
Once satisfied, click Save. This action will create the specified number of new inventory records, each with a corresponding new accession record. When specified, these records will also be added to the specified Inventory group. A dialog prompt will appear, offering the option to print labels for the new material, enabling immediate creation and application of labels to the material.
Manually adding new inventory items
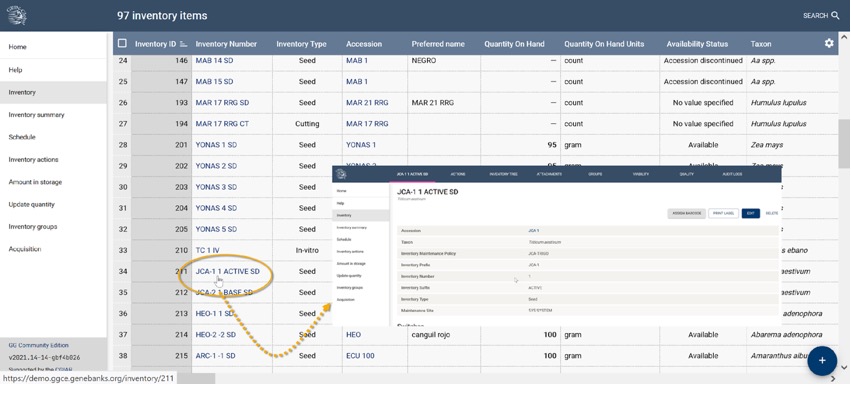
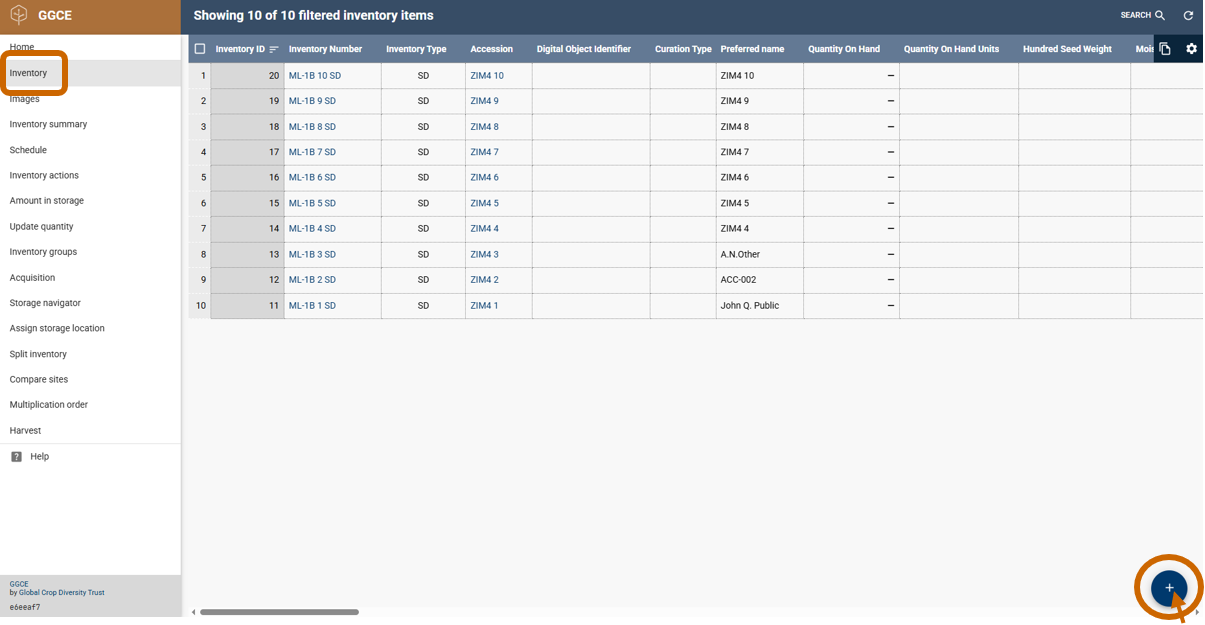
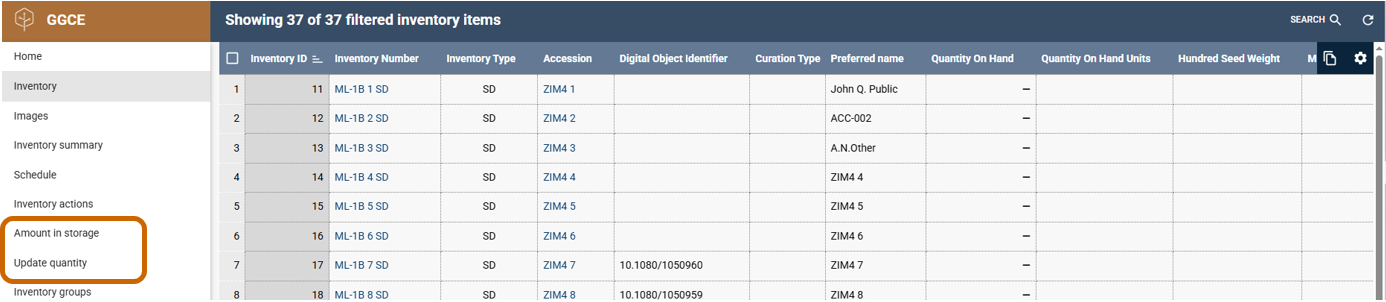
To add a new inventory item individually, select Inventory from the left menu. With the inventory grid displayed (and no rows have been selected), click the Plus (+) action button on the bottom right. This will open the New inventory item form.
The inventory form has several sections to accommodate an inventory record's many data fields. Details on each section are explained below.
- Inventory Item
- Location of germplasm in storage
- Current quantity of germplasm
- Withdrawal and replenishment
- Other information
- Note
Pictured here are the partial details of an existing inventory item.

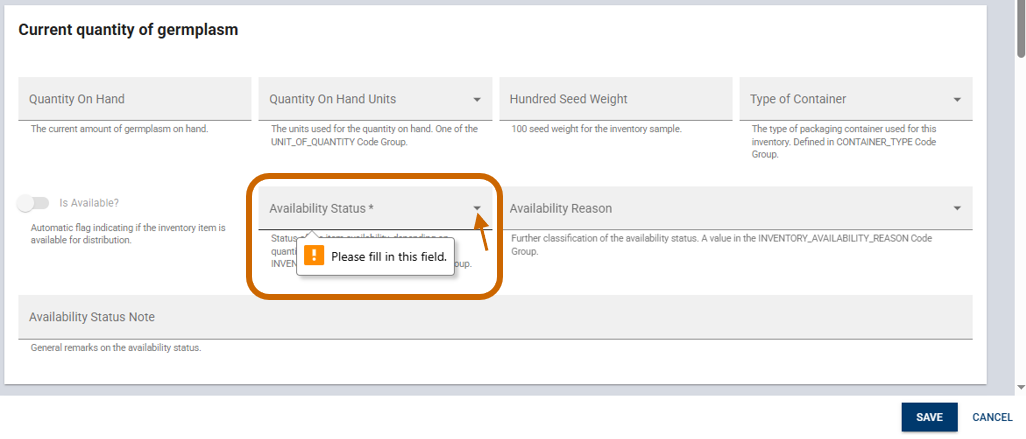
When adding a new inventory record, most of the required fields are in the Inventory item section. One other required field is in the Current quantity of germplasm section – you must select the Availability Status for the inventory item. When attempting to save a new inventory record, the save action will not succeed if all required fields have not been filled in. If an attempt to save a new record fails, scroll through the form's sections looking for any screen prompts to fill out a field.
The fields' descriptions are displayed below the fields.
Remember that nine fields will be filled in when a new inventory form is successfully saved, because these fields are supplied by the selected Inventory Maintenance Policy.
Inventory form
Inventory Item section
For all new inventory items, the following fields in the Inventory items section are mandatory:
- Accession
- Maintenance Policy
- Unique combination of the four fields that comprise the inventory identifier: Inventory Prefix, Number, Suffix, and Type
- Maintenance Site
When saving a new inventory item, one other required field is the Available Status field in the Current quantity of germplasm section.
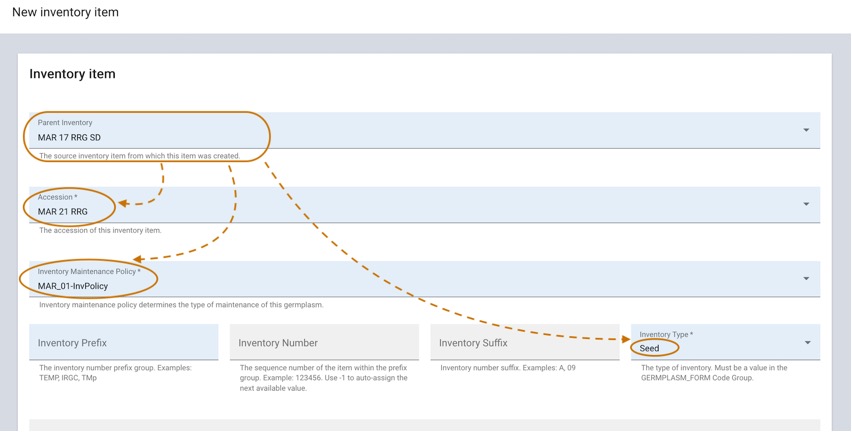
Parent inventory
If known, select the Parent Inventory field (first field on the form) to auto-fill fields such as Accession, Inventory Maintenance Policy, and Inventory Type.
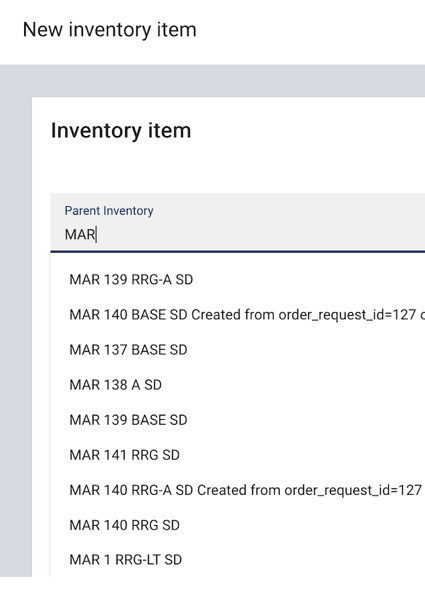
The Parent Inventory field represents the germplasm that was used to create the current inventory item. You can leave it blank, but ideally the Parent Inventory field will never be blank when inventory lots are created through regeneration and the parent lot is known. The data will correspond to an existing inventory number; as you type, a list of inventory identifiers displays from which you can select.
Maintenance Site
Maintenance Site is a required field. As you begin typing in the field, a list of sites will display.
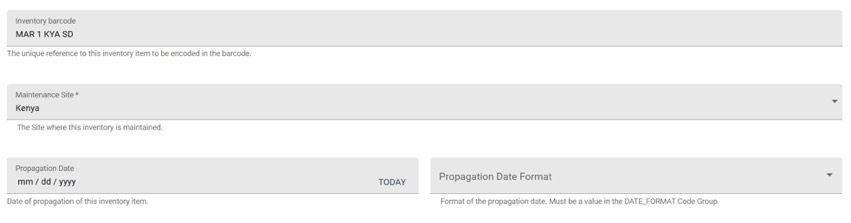
The Maintenance Site field uses sites from a database-managed list. This list is maintained by your genebank's GGCE administrator. If you need to add a new site to this list, please contact them directly. When you select the parent inventory item, its maintenance site is automatically populated into this field. However, if necessary, you have the option to change this value to another site from the list.
The Propagation Date field indicates when the germplasm was multiplied to constitute the inventory material. In situations where the exact date or month is unknown, you can use the Propagation Date Format field to specify an approximate date.
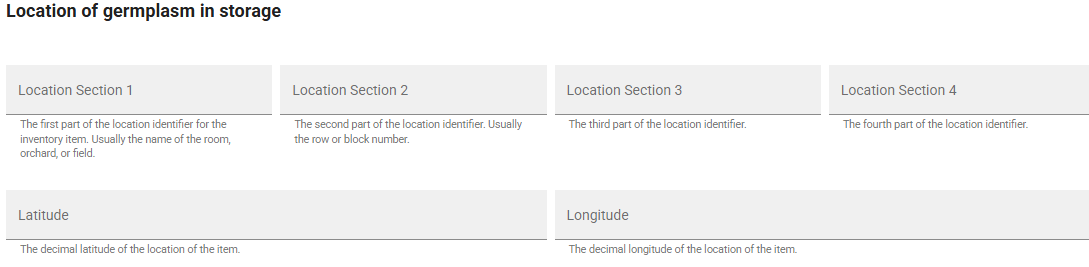
Location of germplasm in storage section
When adding new inventory, the process of recording the precise location of germplasm is perhaps the most important section. It is critically important that genebank staff can always ascertain the exact physical location of any inventory item. Every genebank has its own system in place for naming its storage locations. To accommodate this diversity, GGCE uses generic field titles: Location Section 1, 2, 3, and 4. Alternatively, if the genebank prefers to record the Latitude and Longitude for a living plant, GGCE has two additional fields in this section.
See Storage naming conventions.
Current quantity of germplasm section
This section's fields are primarily used to record the amount of germplasm currently on hand.
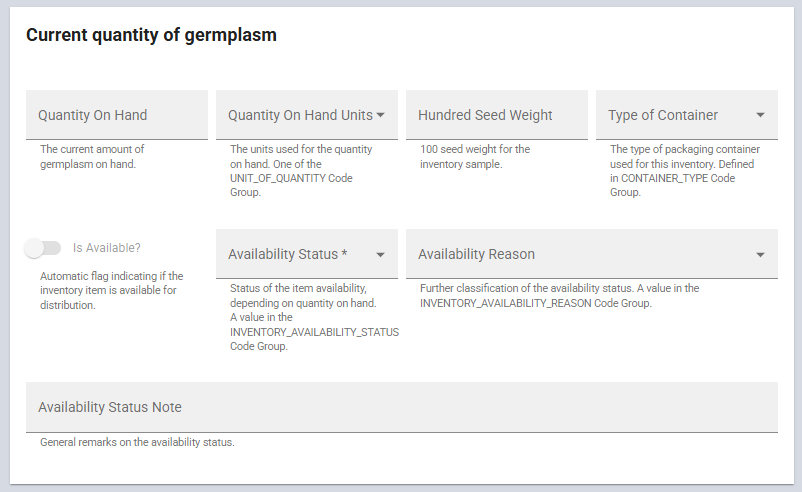
Although Quantity On Hand is not a required field, it is preferable to have this data available and to record it here. The Quantity On Hand Units and Type of Container fields provide dropdown lists from which users can select the relevant values. The Hundred Seed Weight field indicates the cumulative weight of 100 seeds, a commonly used quantitative seed trait.
The Availability Status field in this section indicates the current availability status of the inventory. It is a required field for every inventory item and the value must be selected from a dropdown list before the inventory record can be saved. It's best to start with Not set for new inventories.
Not set (NOT-SET), Low inventory (LOW) and Available (AVAIL) have special meaning in GGCE and are automatically updated as the quantity of an inventory changes.
If the status is Not set or Low and the quantity exceeds that of Distribution Critical Amount then the status is set to Available. When the quantity drops below this threshold, the status is changed from Available to Low.
GGCE will not automatically modify Availability Status when some other option is used.
The Is Available? switch is managed by GGCE and simply indicates whether the Quantity On Hand is more than Distribution Critical Amount (or 0 if that's not specified).
Updating quantities
When it becomes necessary to review or modify inventory quantities, GGCE offers multiple methods to do so. The Inventory menu located in the left pane provides two options: Amount in storage and Update quantity.
These options can also be accessed on the GGCE home page.
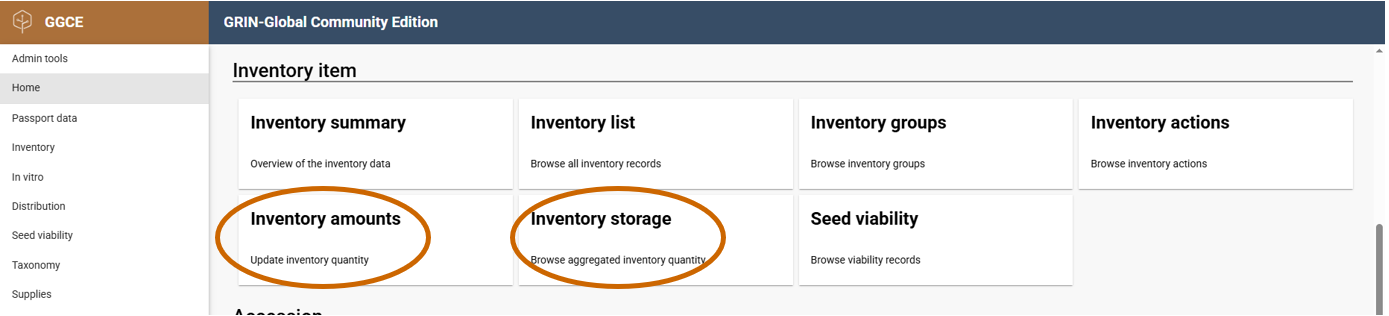
Amount in storage
The Amount in storage option provides detailed information about materials conserved in the genebank, including type, status, quantity, and inventory count. Users can easily filter the list by entering specific search criteria.
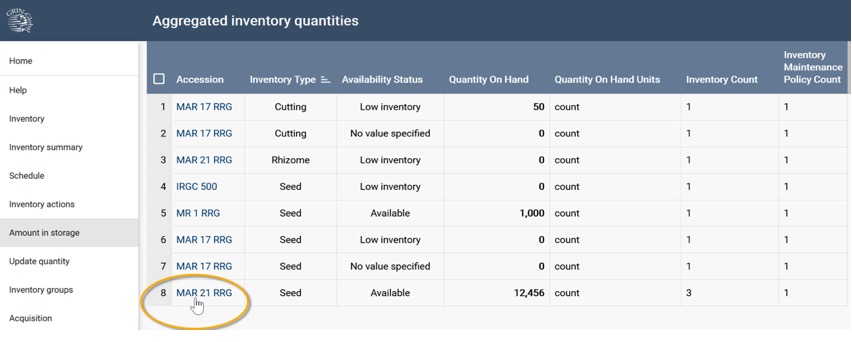
The results display the aggregate amounts for the accessions, offering a clear summary of all conserved material.
Withdrawal and replenishment section
The Withdrawal and replenishment section documents how the germplasm quantities are distributed and monitored. The fields describe how each inventory is distributed – the quantity and the form in which the material is distributed. You can also use the section to specify critical quantities to help your genebank monitor inventory quantity levels. The Availability Start Date and Availability End Date fields serve solely as information notes or reminders for genebank staff, and do not affect the actual availability of germplasm.
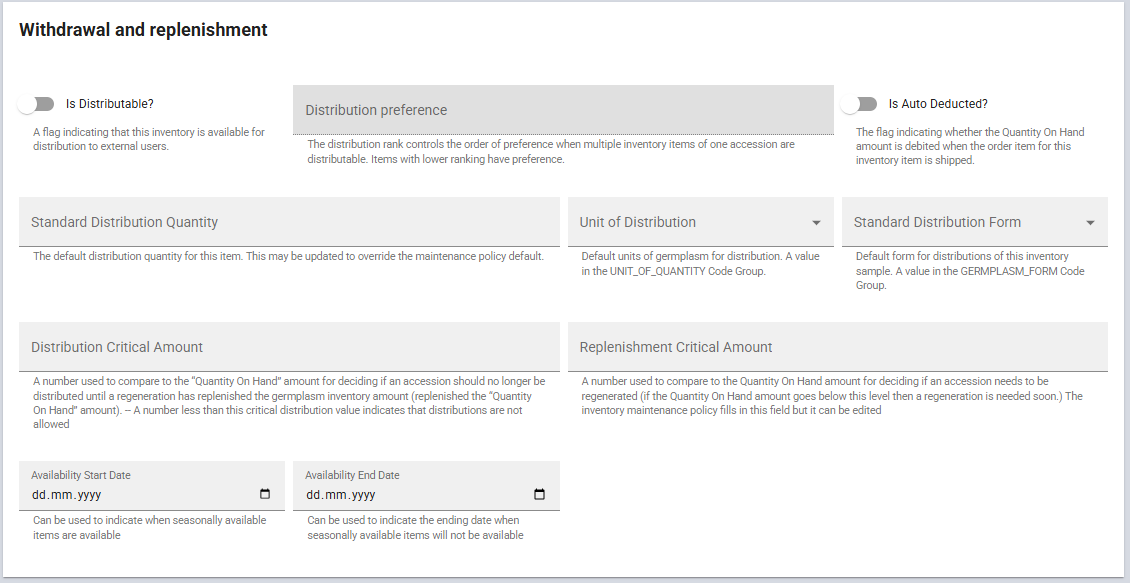
This section outlines the details of inventory item fields that are governed by the selected Inventory Maintenance Policy. When an inventory item is initially saved, many of these fields are automatically populated based on the chosen policy. Refer to the inventory maintenance policy documentation for further details. The listed items in bold below indicate the automatically populated fields:
- Is Distributable?
- Is Auto Deducted?
- Standard Distribution Quantity
- Unit of Distribution
- Standard Distribution Form
- Distribution Critical Amount
- Replenishment Critical Amount
- Availability Start/End Date
- Availability Status Note
Your genebank should use the two critical amount fields to ensure sufficient quantities of germplasm are in storage. The Distribution Critical Amount determines the minimum quantity of material that must be on hand to permit external distribution of germplasm while the Replenishment Critical Amount sets the threshold at which you must initiate multiplication of the material to replenish the inventory. Typically, the Distribution Critical Amount is set higher than the Replenishment Critical Amount, as it is prudent to stop external distribution before the inventory falls to a level that could compromise future multiplication efforts. This ensures there is sufficient material on hand in the genebank in case the multiplication attempts fail. These thresholds are established by your genebank's experience with the germplasm, the species' viability considerations, and the frequency of requests for the material.
The Availability Start Date and Availability End Date are note fields that provide a reference for the period during which each inventory is eligible for distribution.
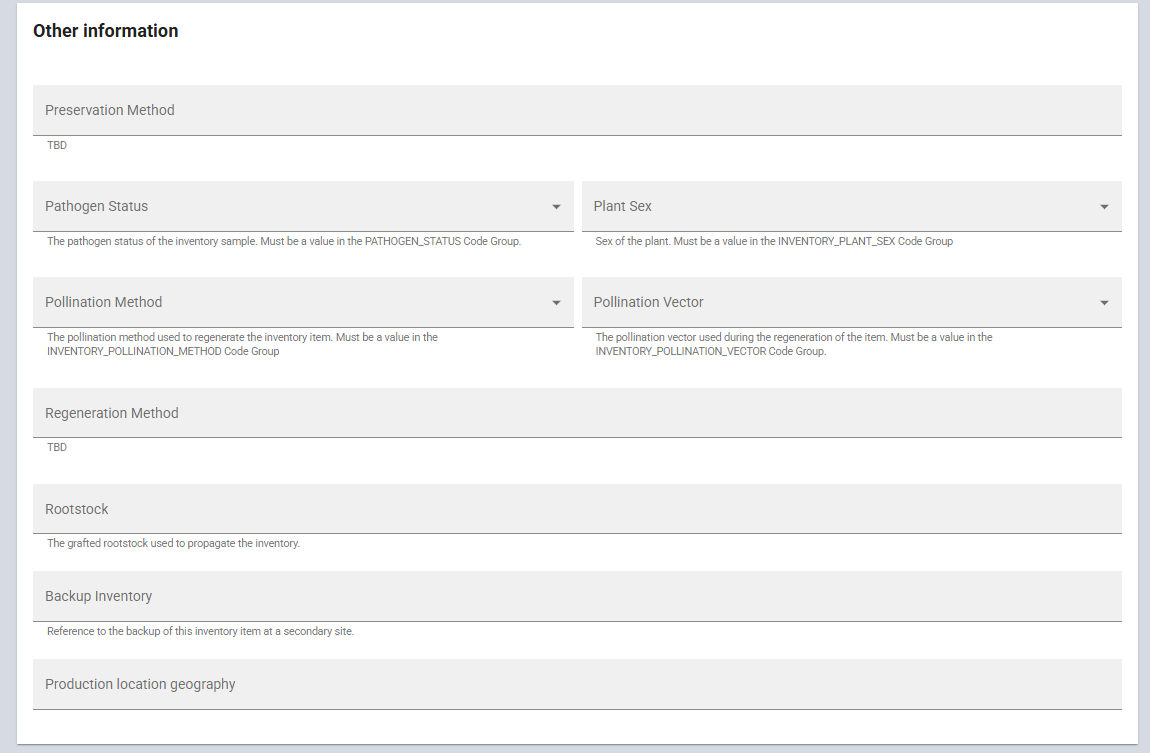
Other information section
All the fields in this section are optional; some fields do not apply universally to all germplasm.
The Preservation Method and Regeneration Method fields reference methods stored in a GGCE Methods table, which not only documents procedures but may also provide narrative descriptions of environmental conditions. In contrast, the Pollination Method field utilizes code values defined by the administrator in the GGCE Code table. Similarly, the Pathogen Status, Plant Sex, Pollination Method, Pollination Vector, and the Production location geography fields all use standardized codes. The Rootstock and Backup Inventory fields accept free-text input.
Note section
The three note fields are text fields. The Note field is strictly for internal use and will not display on a public website, whereas the Web Availability Note is intended for external users. This distinction ensures that sensitive internal information is kept private, whereas relevant details for the public are appropriately displayed. The Digital Object Identifier (DOI) is a unique, persistent link consisting of a string of numbers, letters and symbols (typically in the format 10.xxxxx/xxxx) assigned to the inventory and can be used to uniquely identify and access it reliably over time.

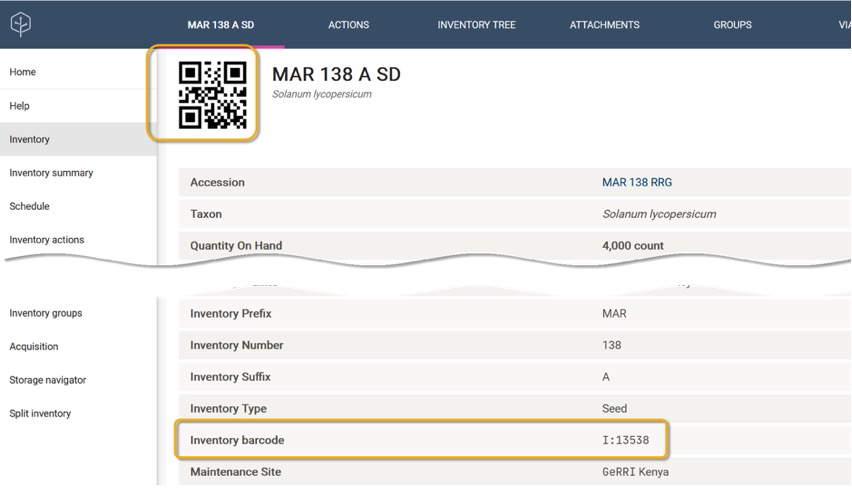
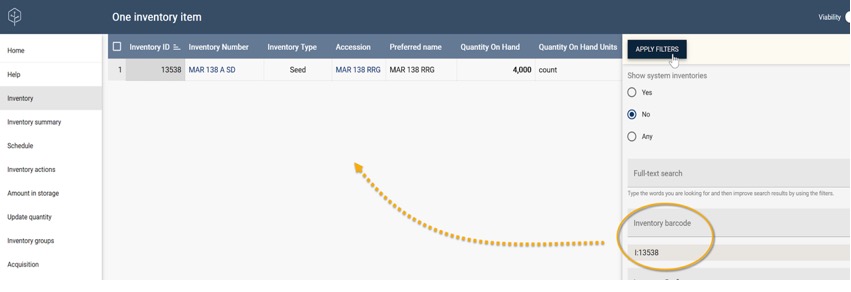
Inventory barcode
The Inventory Barcode encodes a unique identifier that is printed as QR, Datamatrix or linear barcode on labels. These labels can be affixed to germplasm packaging, allowing barcode readers to seamlessly interact with GGCE. This barcode scanning capability streamlines processes throughout GGCE when working with the germplasm.
For each inventory item, a barcode is automatically generated upon its initial save. If you have an existing barcoding system in place, you can simply scan the current barcode into this field.
The barcode's text equivalent is also displayed in Inventory details (e.g. I:13538 in the example below). If a barcode scanner is unavailable, you can use this text identifier to search for the inventory data.
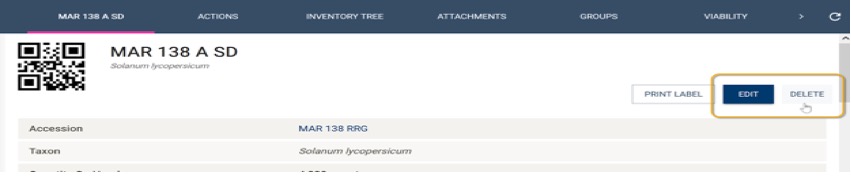
Editing (or deleting) existing inventory items
When the inventory list is displayed, you can select an inventory item by clicking on an Inventory Number. This action will display the form for the corresponding item, allowing you to update its details as needed or remove the item from the inventory entirely.