Seed viability
A genebank’s primary goal is to conserve the germplasm that it maintains efficiently. To do so, it is important to ensure samples are kept alive, making viability testing – also known as germination testing – an ongoing, fundamental genebank task.
The challenge for genebanks is balancing their human resource constraints with the need to perform adequate testing of their inventory. As a result, genebanks must prioritize which inventory items are to be tested then systematically plan a practical schedule.
GGCE supports these efforts with its Schedule feature, enabling genebanks to review planned tests over specific date ranges, adjust schedules as needed according to available resources, and proceed with testing as planned.
This document is not intended to elaborate on deciding when and how often tests should be done, but rather to document how you can use GGCE to manage viability testing at your genebank after the genebank has considered its testing capabilities and has decided on its testing objectives. GGCE’s seed viability functions can help your genebank schedule tests, monitor the progress of the individual tests, and ultimately record the test results.
Most viability testing recommendations suggest that an initial test should be conducted within 12 months of an accession being introduced into the genebank. After the initial test, each accession should be tested with an ongoing frequency of no less than every ten years. Five to ten years are typical intervals, depending on the species. Much has been written about this, including one CGIAR reference available here.
Viability rules
In GGCE, a viability rule specifies the conditions used in a germination test. When establishing a new viability test, you will need to reference a relevant viability rule; therefore, you must create a viability rule before you create the test.
Most of the fields in viability rules are text fields, and rules are helpful in documenting the protocols that are followed. Your genebank can review the testing conditions that were followed for any viability test by reviewing the rule associated with the test.
Generally, the same rule will be used for the same taxon, through multiple rules may be associated with a single taxon if different protocols are appropriate; for example, if the taxa are tested in more than one way. Conversely, a single rule may also apply to several taxa.
As your genebank uses GGCE over time, the need to create new rules will most likely diminish, as you will have a set of defined rules from which to select.
Note that new viability rules can be created as needed, so your genebank does not need to create them all at one time. Your genebank should develop a good naming convention for its rules so that they are easily recognized and meaningful.
When creating a new viability test, one of the required items on the form is to select a viability rule – hence the need to create the rule before you create the test referencing the rule.
When a new testing protocol is adopted, a new rule should be created rather than editing an existing one – unless the rule has never been used, in which case, editing an existing rule is permissible.
Viability tests and viability observations
In GGCE, a seed viability test records the summary results for one test done at a certain time for one specific inventory item. This record will have its own unique ID number and barcode. For discussion purposes, let’s use 75 as a test ID number.
Typically, seeds are split into two replicates for each viability test. Each replicate is observed – the seeds are counted as normal, dead, etc. The counts are done at two specific time intervals, depending on the testing protocol – for example, 7 and 14 days after the test was started. When recording an observation, in the case of test number 75, the two replicates will use 75.1 and 75.2 as their observation numbers. The replicates will both be reviewed and the seeds counted twice. On day 7 this will be the first count, and on day 14 the second count. In this example, GGCE will record four observations: two replicates, two counts each.
Ultimately, when the test is completed, the summary of the observations is aggregated and the final viability percentage is calculated for that inventory item for that specific test. Over time, GGCE can store multiple test results for the same inventory item. Obviously, this is very helpful, as your genebank can determine how the seeds’ viability changes with time.
If your genebank previously used GRIN-Global and is migrating data to GGCE, as an administrator, it is important to note that GRIN-Global contains two similarly named viability tables. For whatever reason, your genebank may not have stored observation data in the inventory_viability_data table, but instead only used the inventory_viability table, which does not store the individual observations made for each replicate and count. The latter table contains only summary data such as the final viability percentage score for the overall test. This distinction should be understood when converting data.
Seed viability menu
The menu and options for viability testing can be accessed by selecting Seed viability on the main menu or selecting the Seed viability button.

After selecting Seed viability, the grid of existing viability records is displayed under the Browse inventory viability banner. In addition, the Viability records option on the viability menu is automatically selected. At this point, you can select any one item to review or edit.
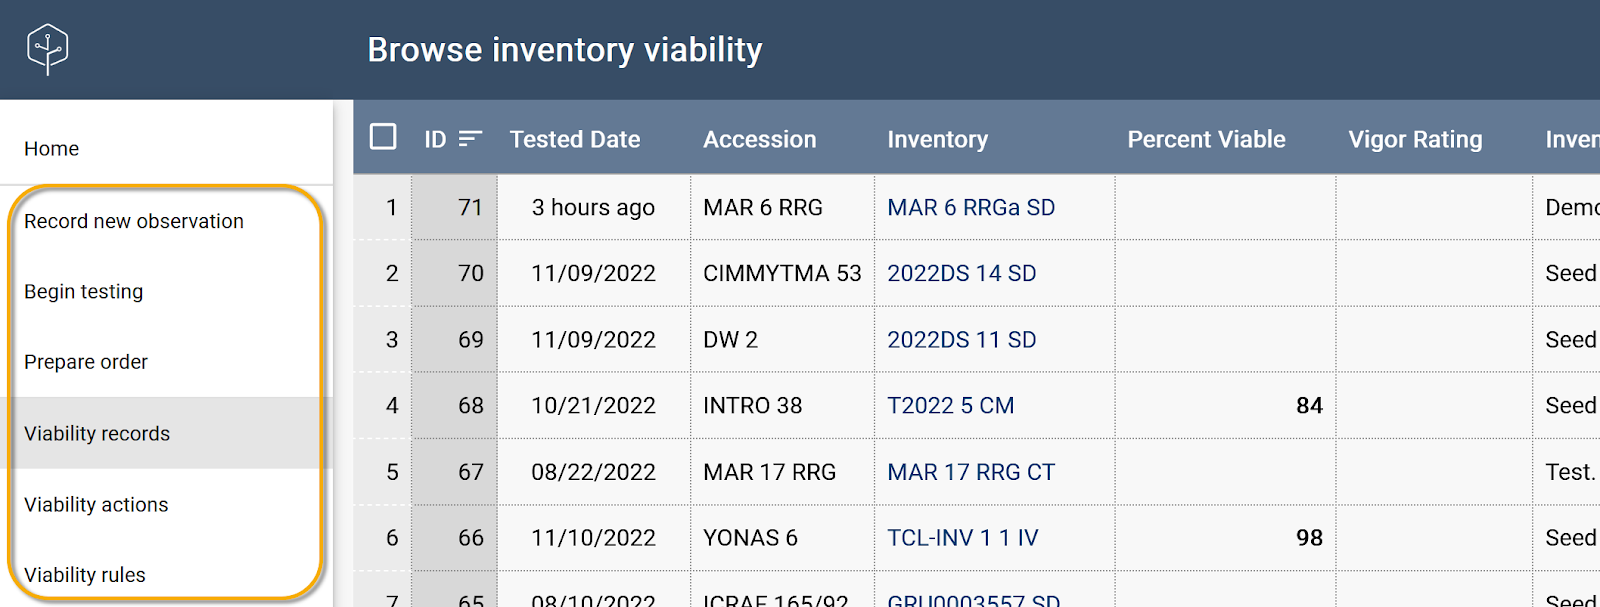
The Seed viability menu options include:
- Record new observation is listed first since it is the most commonly used tool to scan replicates and record observations
- Begin testing allows you to initiate or schedule a viability test
- Prepare order displays the list of germplasm scheduled for testing and lets you create a request for material
- Viability records allows you to browse and search viability test records
- Viability actions shows actions related to viability testing
- Viability rules lets you define the different testing protocols
Sequence of steps for viability testing
Typically, the sequence of steps in viability testing is as follows:
- Schedule an inventory action for a viability test for one or more inventory items.
- Prepare an order associated with the scheduled viability test for receiving the material to be tested.
- Record new observations:
- After the material has arrived at the testing lab location, subdivide each sample into replicates.
- Record the observations (record the germinability of each replicate).
- Complete the test and calculate the seed viability.
Scheduling an inventory action
Before using GGCE to execute a testing plan, your genebank will have held discussions and done other preliminary work in deciding the testing priorities for your crops and developing an overall plan. Your genebank then needs to establish a reasonable viability testing schedule that it will be able to manage. GGCE facilitates this by allowing users to create and manage schedules for viability tests.
Reviewing inventory viability test history
GGCE allows users to review previous inventory tests either through the Inventory menu by searching for Inventory actions with the Action name “Viability test” – or through the Schedule feature on the Inventory menu.
In addition, one can review the “Latest Viability” and “Latest Viability Date” when reviewing inventory records.

Scheduling germplasm for viability testing
Once accession or inventory items are selected for testing, the initial step in executing a viability test is to schedule an inventory action in the Inventory section.
Select Inventory on the left menu panel. In the Inventory grid on the right side, select one or multiple inventory items, then indicate that you will add an action using the action button at the lower right.

The form has several fields that are not mandatory, but it is recommended that you complete them.

In the Add inventory action form:
- Select Viability test for the Action Name.
- Enter a test Quantity (e.g. enter 100 seeds if you will be testing two replicates of 50).
- Choose a Method from the list, or if the desired method is not in the list, you may continue filling out the list and later, after creating the new method, edit this form.
- Select a Cooperator (such as a field technician carrying out the test) in the Action Cooperator field.
- Since the primary purpose of this action is to indicate a desired date, you will complete the Not Before Date field. A format field (Not Before Date Format) is used to indicate the date specificity – for example, when an actual date is not specified (or critical), the month and year can be used for the format. When periodically reviewing actions, you can modify your schedule as necessary by editing this date field.
Searching for and finding viability test actions
All genebank tasks related to an action taken with an inventory sample can be recorded in GGCE. Ideally, your genebank thoroughly records all tasks, so at any point in time the status of an inventory item can be determined. Has the seed count been verified? Were the seeds cleaned? Has a viability test been completed? These inventory actions can be searched and reviewed – but of course they must first be recorded!
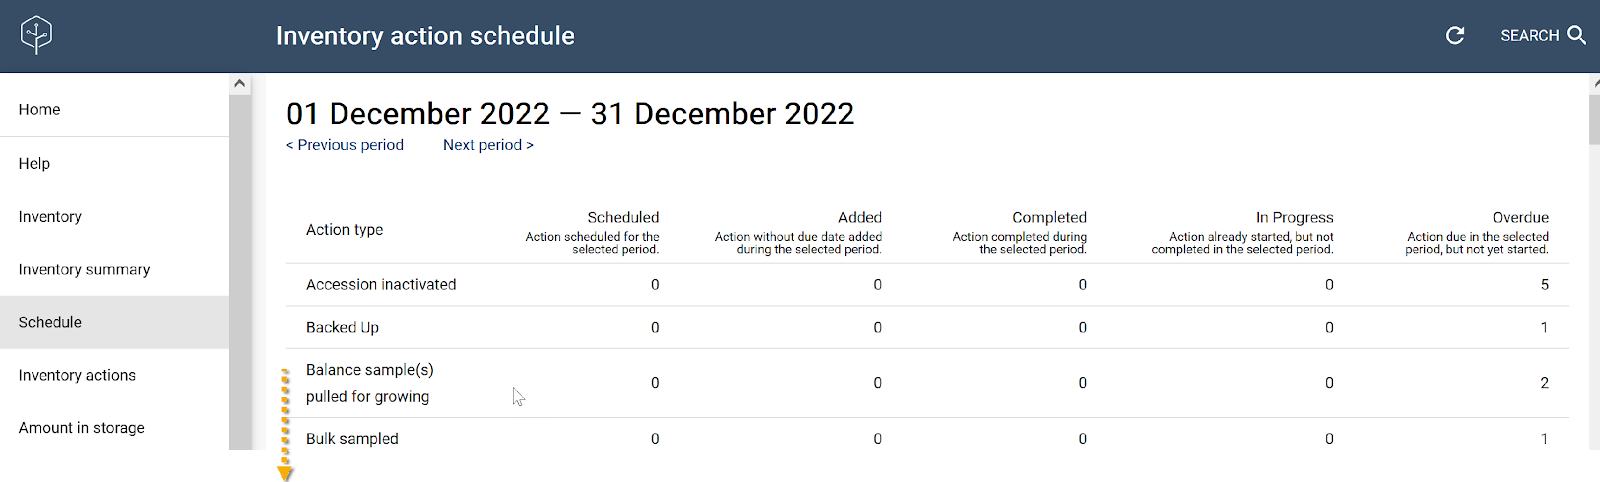
For any inventory item that has been assigned an inventory viability action, you can use the Inventory action schedule feature. In the following example, Scheduled viability test actions were found and then listed.
Preparing orders for viability tests
Distribution requests can and should be created when multiple inventory items are to be tested for viability. On the Seed viability menu, use the Prepare order option.
Select one or more inventory items from the list and then use the action button in the lower right to select Prepare order.

The Prepare order for n inventories form displays. You must complete several fields: Inventory Viability Rule, Maintenance Site, and Cooperator.

The Cooperator selected in this form is the recipient of the material. You should select the technician doing the test so that the seed for testing is delivered to them.
Then click the Create Order button to register the request for material. Observe that the items included in this order are no longer included in the list of germplasm scheduled for viability testing.
Adding a new viability test
Once your genebank has established its viability testing priorities, it can use GGCE to plan its viability testing in a systematic way.
Before setting up and scheduling tests for specific inventory, your genebank must create viability rules.
Beginning a test
Use the Begin testing option on the Seed viability menu. Use the scanner to scan an inventory label or enter the inventory scan number to start or schedule a test for that inventory item.

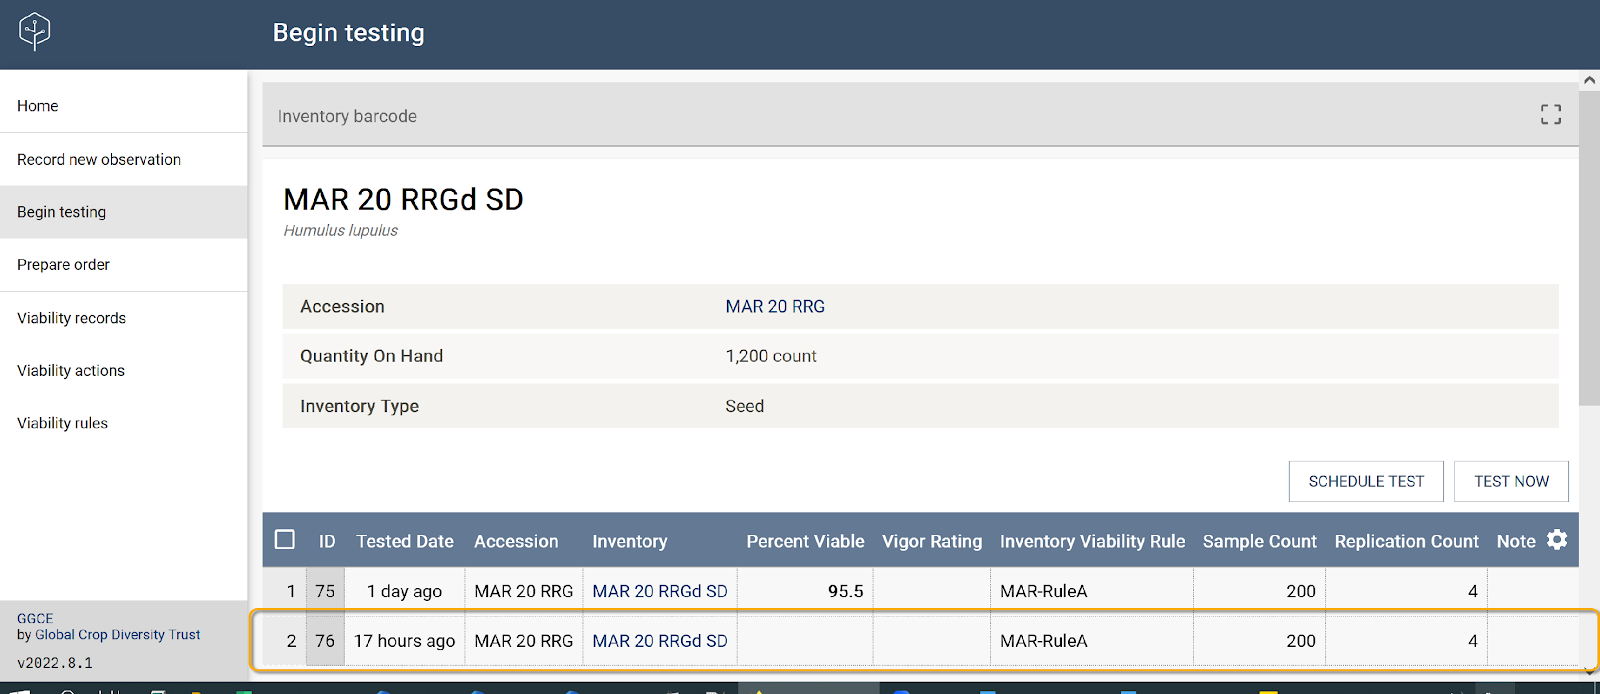
The resulting screen displays the basic information about the germplasm selected and the list of viability tests completed and in progress for this inventory item. You can then start a new test immediately or schedule a future test. The two buttons are displayed on the lower right.

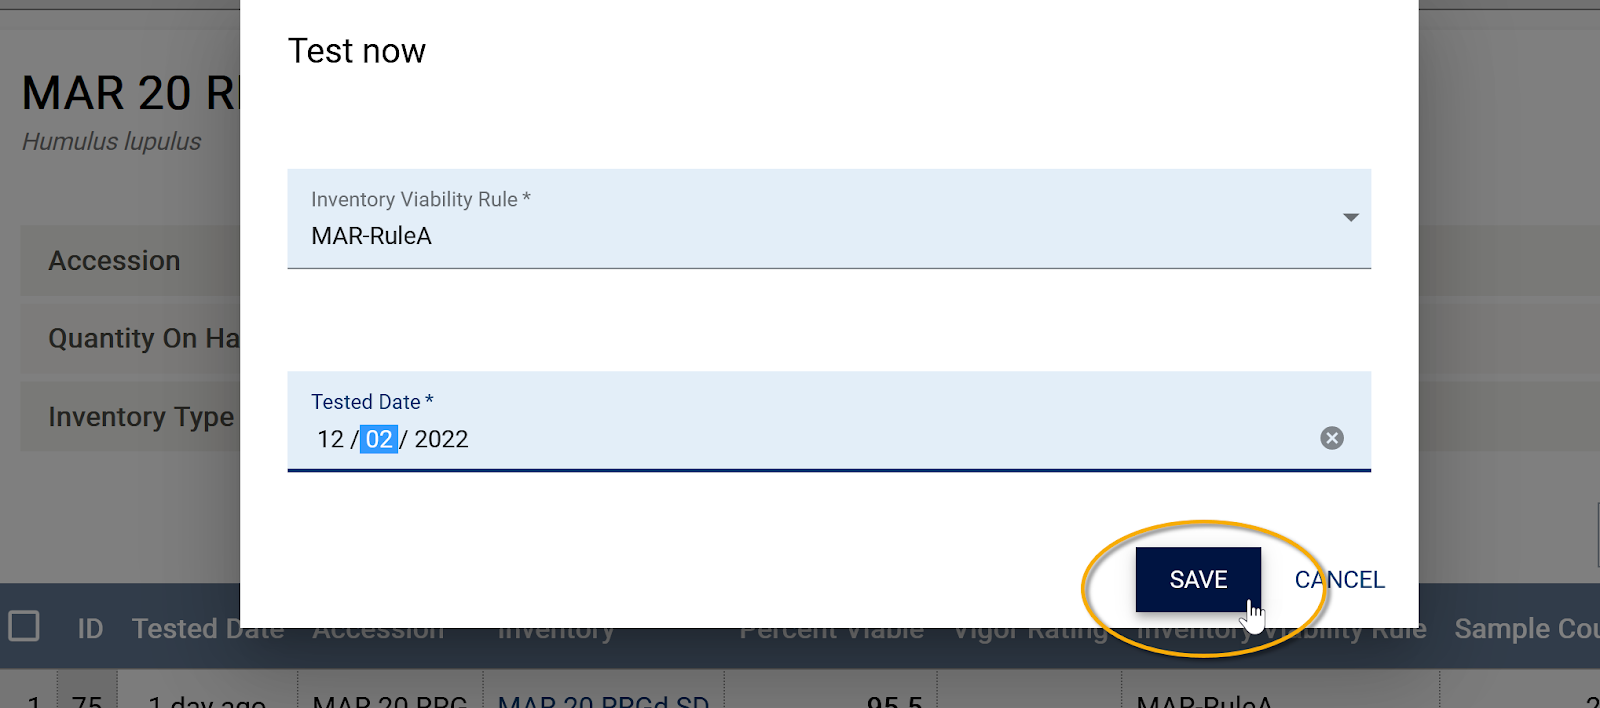
After the Test now button is selected, you will be prompted for a Viability rule name and a Test date.
GGCE will register a new viability test in the database and display a new row for the test (below, the row with an ID of 76 is the new test item for the inventory). If you want to immediately proceed to recording observations, you can do so using the ID and the observation number (in this example, 76.1). Refer to the Record observation section for details.
Scheduling a test
When the Schedule test button is clicked, a confirmation window displays indicating that an Inventory test action has been created.
Germplasm scheduled for viability testing is listed in the Prepare order tool.
Viability test details
GGCE then displays the Inventory viability screen. Usually, the next step is to prepare the substrate – the towels, paper, or media used for the testing, and produce labels for each replicate. Use the Generate labels button to do this.
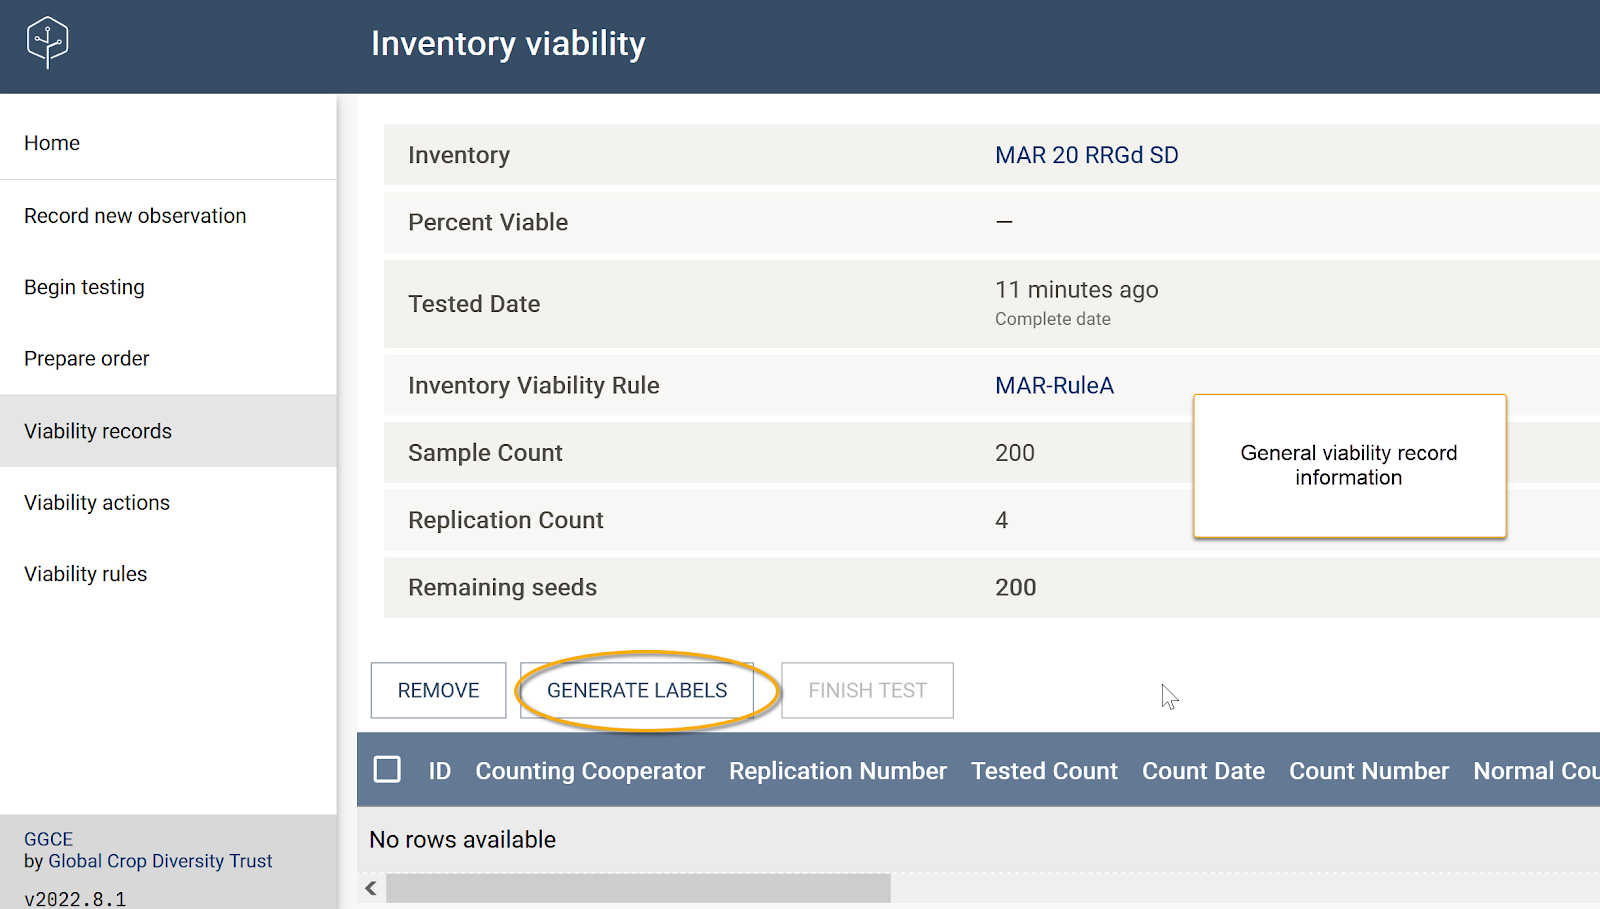
See documentation on labeling for more information about printing labels and barcoding.
Labels with barcodes or QR codes are generated for each replicate to record observations.
Recording observations
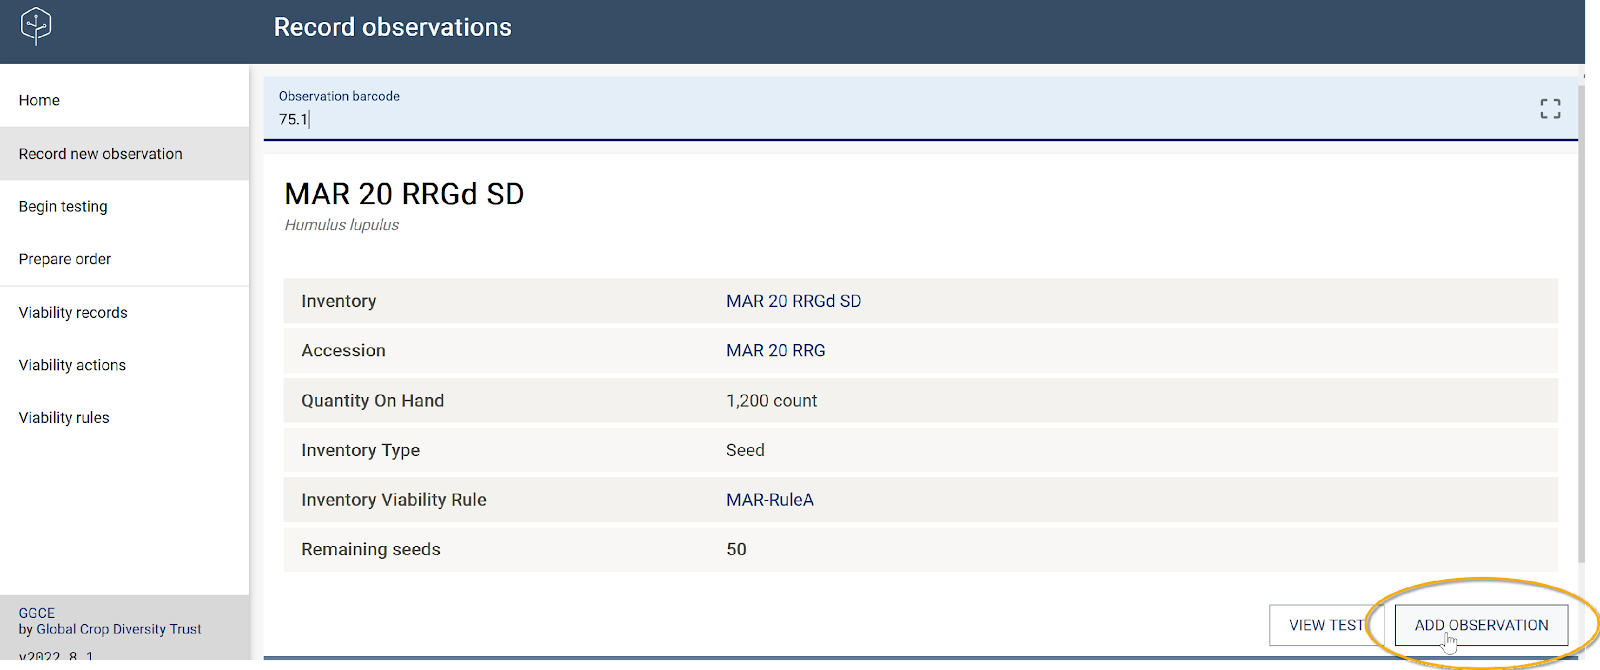
To record observations, you must scan the barcode on the label printed in the earlier step and attached to each replicate.
If the barcode is damaged, the viability record ID with the replicate number can be entered manually, as these are printed on the label. This identifier is also printed on the label.
Alternatively, use the Viability records menu option to manually determine the ID of the corresponding test. For example: If the test with ID 75 has four replicates, the replicates are identified as 75.1, 75.2, 75.3, and 75.4. However, tests often require just two replicates. In that scenario, when the test ID is 75, the replicates would be identified as 75.1 and 75.2.
After scanning the barcode of the replicate, the screen provides pertinent details and displays an Add observation button in the lower right.
Observation form
The observation form is scrollable and contains many fields. Fields not frequently used are displayed when the Advanced option is selected.
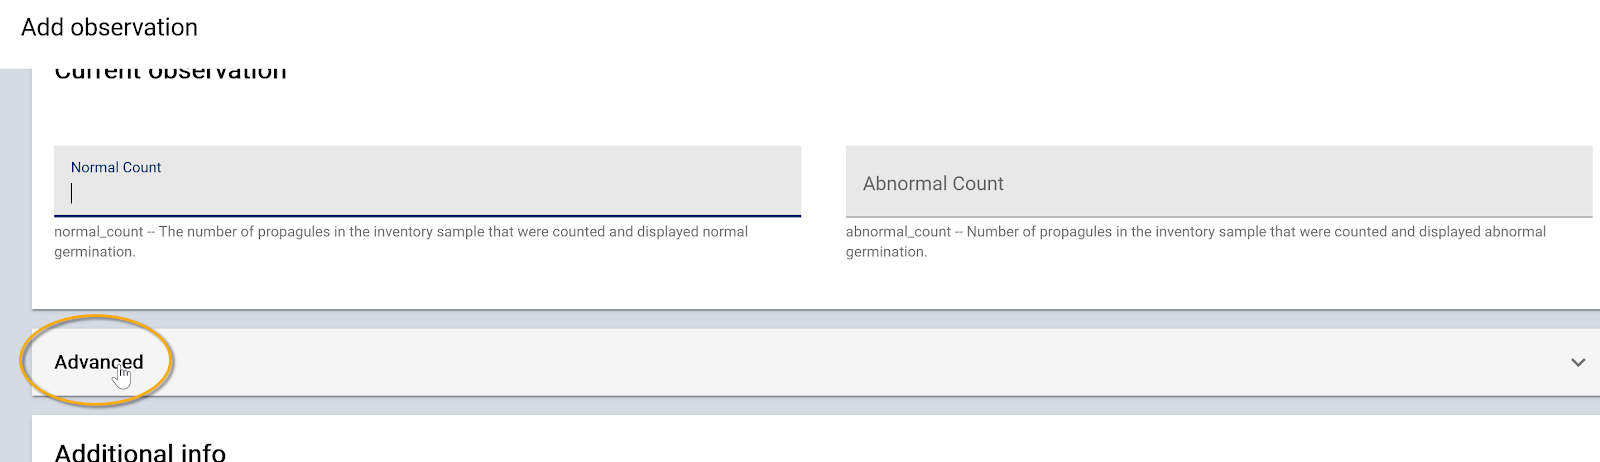
Generally, the basic data is entered: the Normal and Abnormal counts. Remember to click Save after entering the counts.
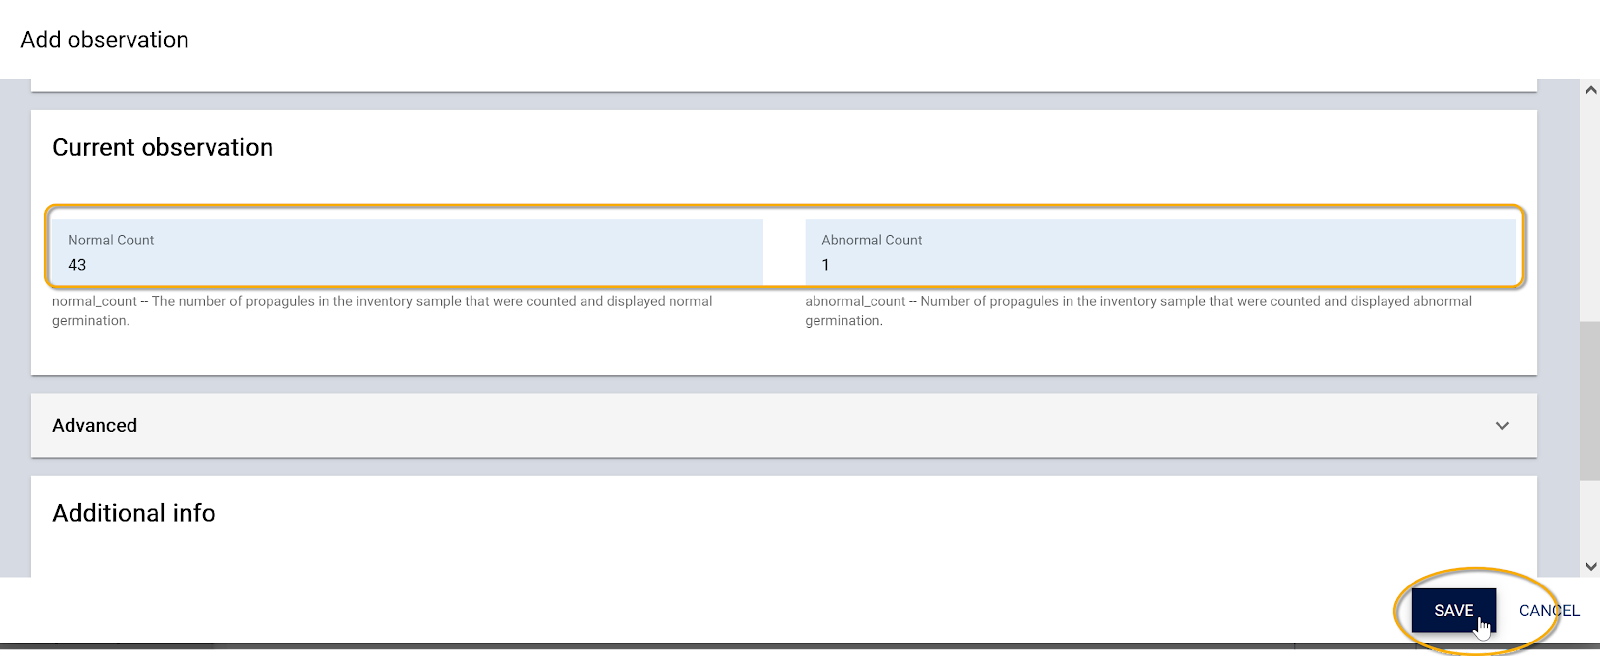
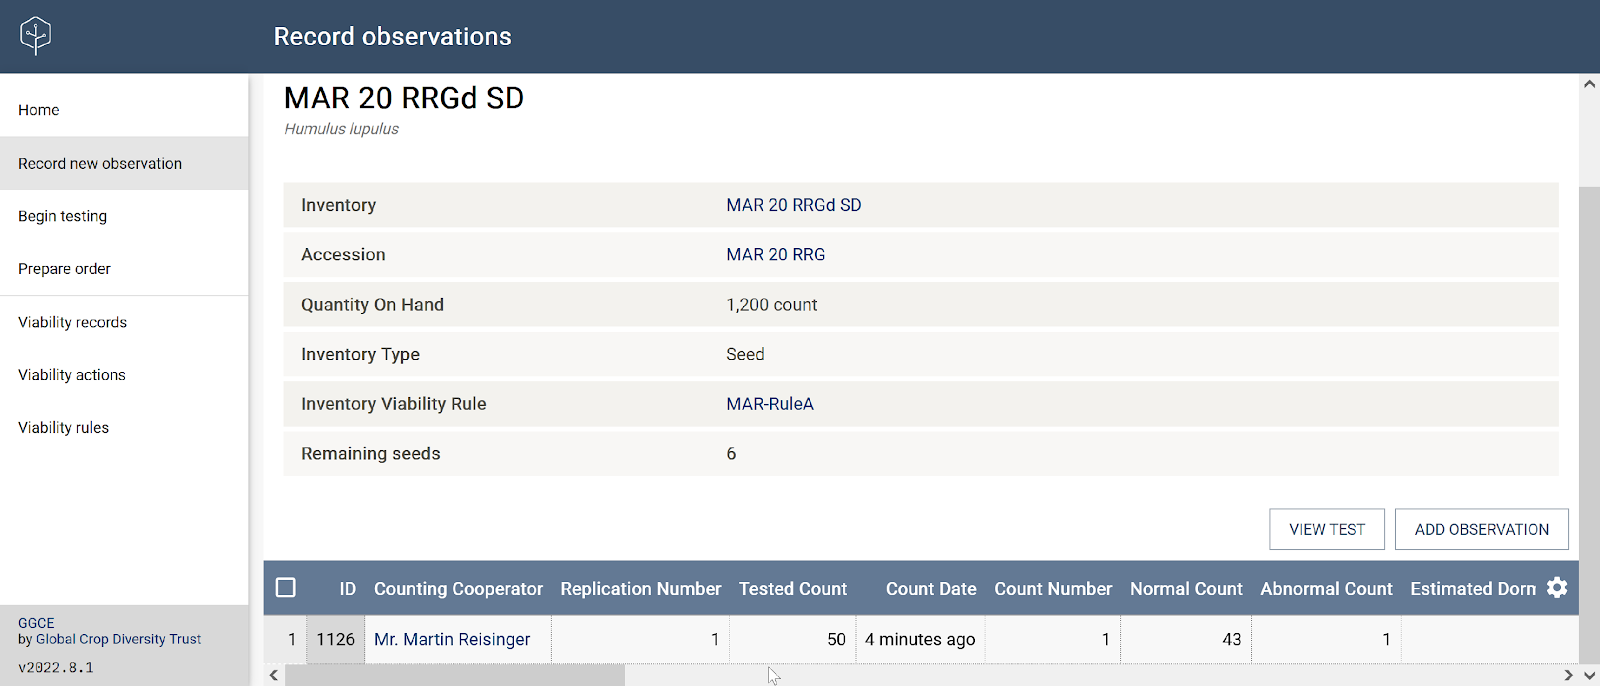
After saving, GGCE will display the main viability information, including how many seeds are yet to be reviewed – in this example, “Remaining seeds = 6” – and the observation(s) in a grid. In this case, only one observation has been recorded so far. This was the observation for replicate 1.
Since in this example the test was designed to use four replicates, the same procedure will be followed for making three more observations. Eventually, after all four replicates have been reviewed, the summary will list the four individual observations and indicate the number of remaining seeds.

A test can only be completed when you have a count of 0 remaining seeds.
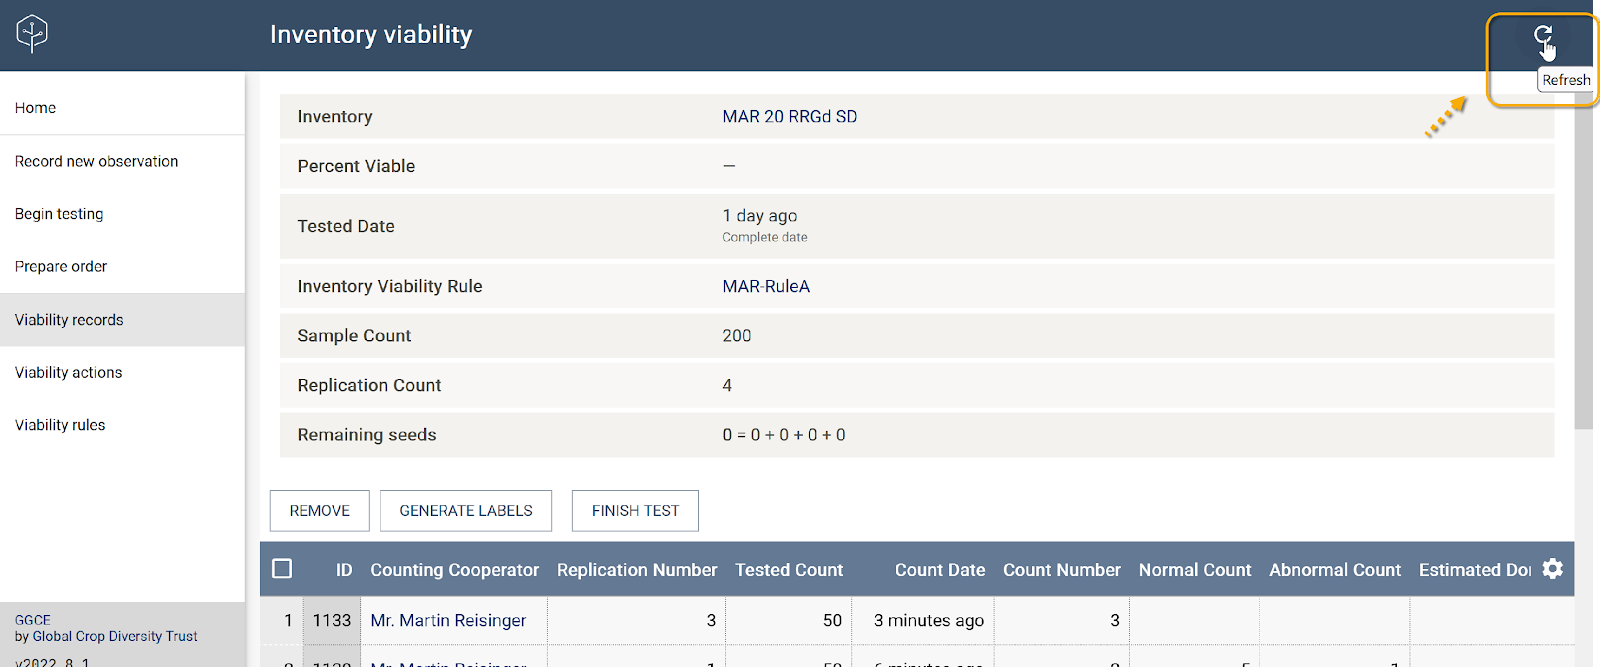
If results do not appear as expected, use the Refresh button.
Editing and deleting observations
If you need to edit or delete an existing observation, use the menu option Record new observation. Simply use the scanner or the barcode text of the existing observation that is to be changed. In the following example, the observation record with the 1133 ID was entered mistakenly and needs to be deleted. There was no 3rd count; the user had meant to indicate the 2nd count for the 4th replicate.
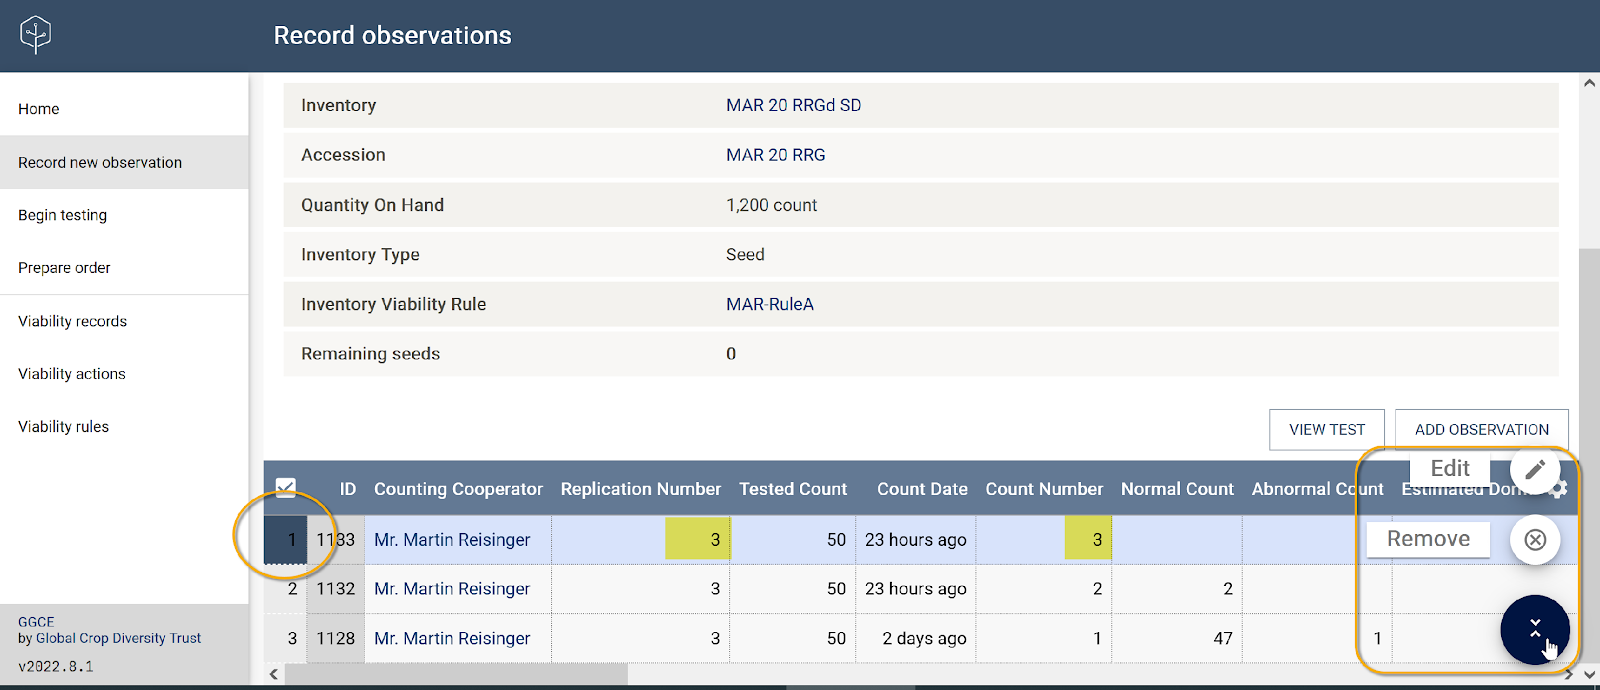
If you select Remove, you will then be prompted to confirm the deletion.
Finishing the test
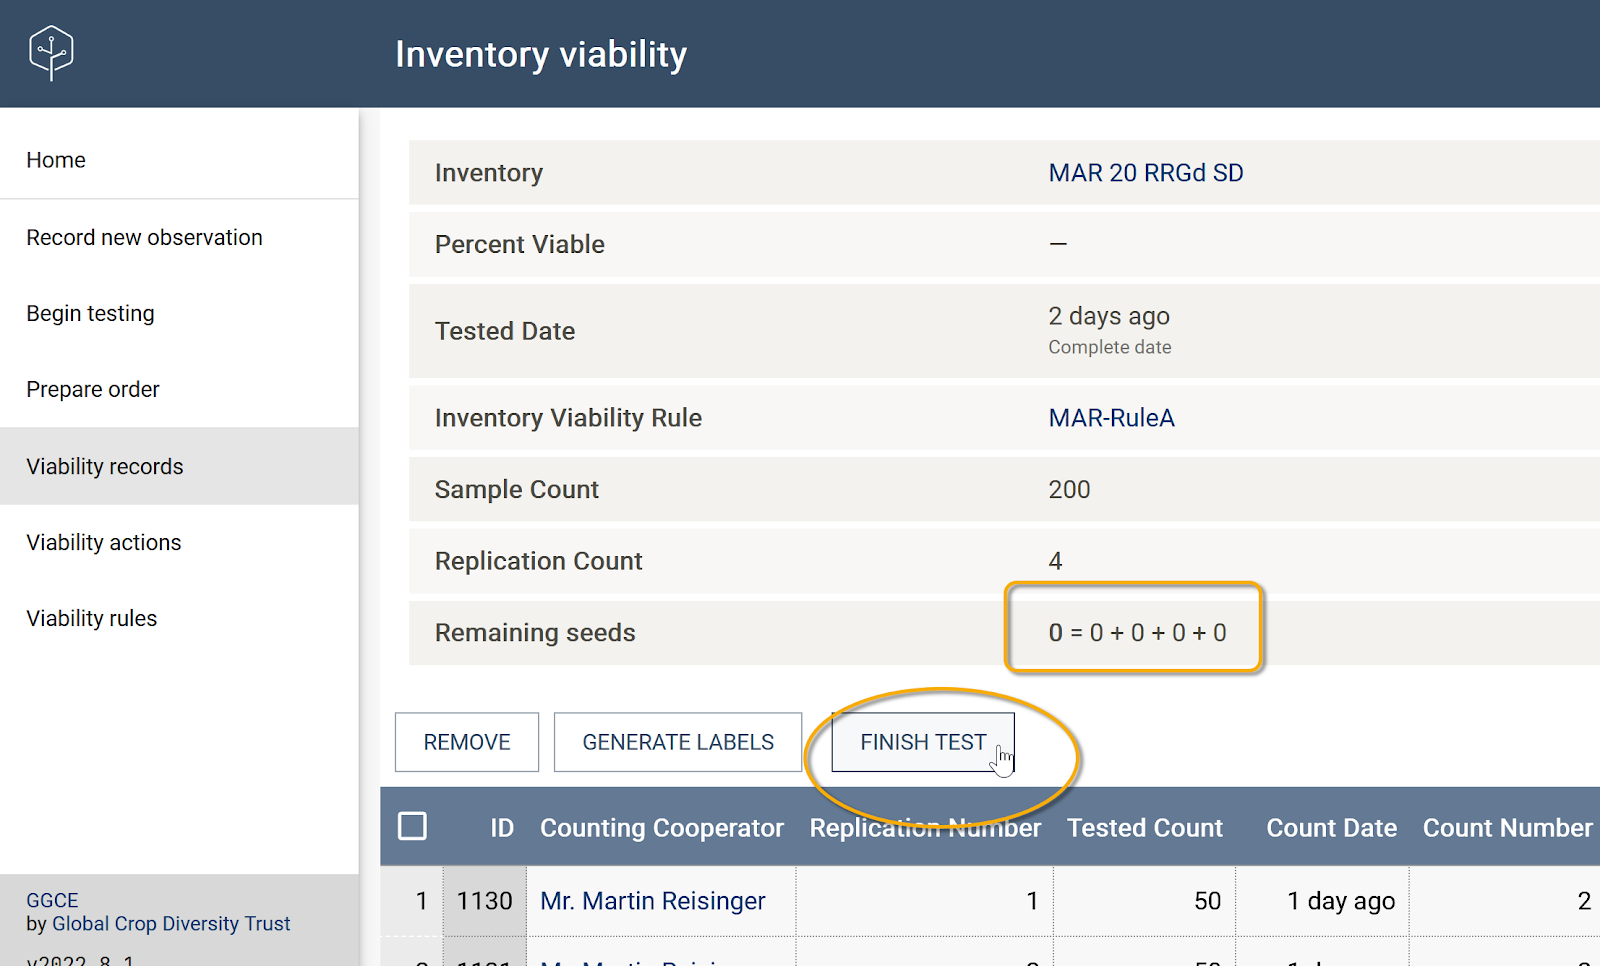
In the example below, there were four replicates. All seeds were accounted for (“Remaining seeds = 0”). To complete the test, click the Finish test button.
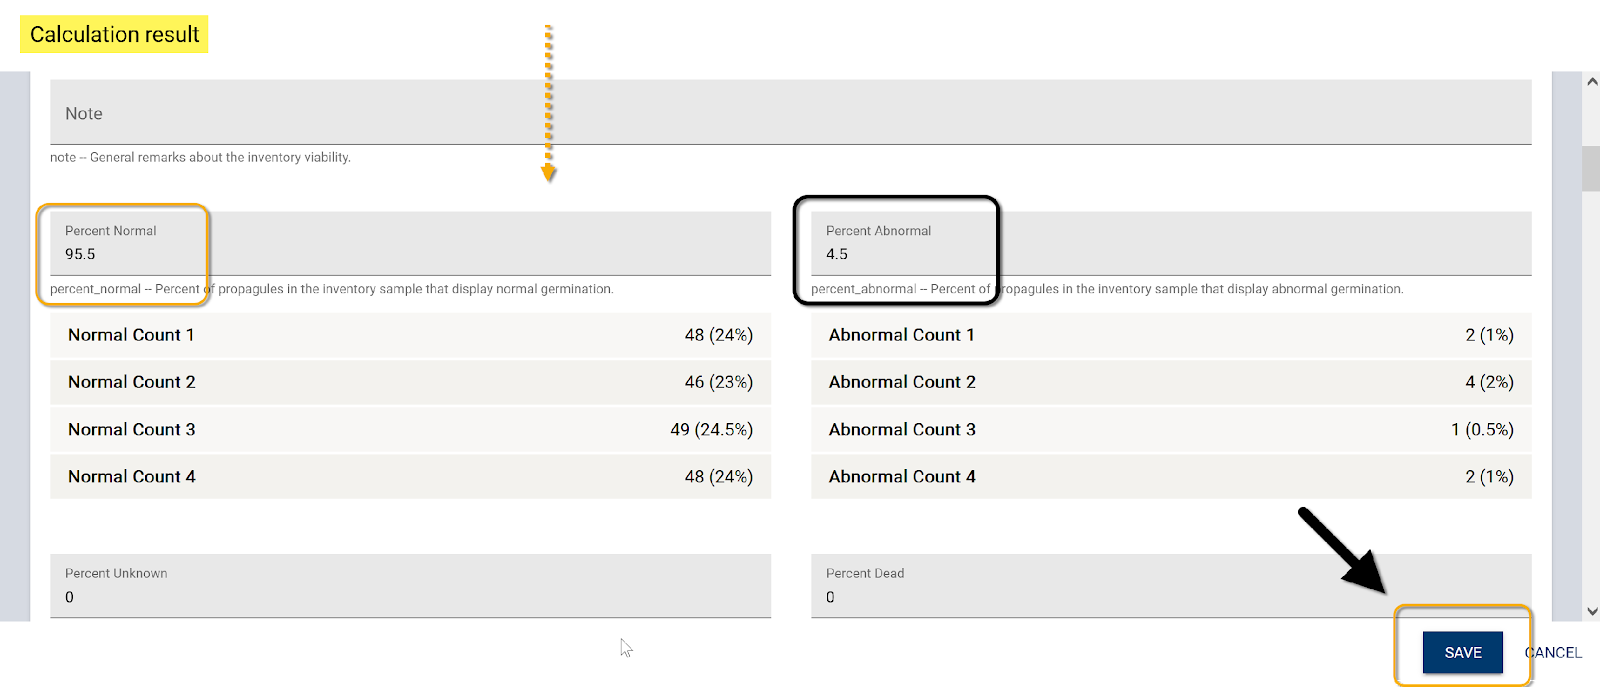
Calculations made and performed and the results – showing cumulative percentages of normal and abnormal seeds, among many other details – are displayed.
The actual and the maximum tolerated range alert is displayed when completing a viability test with two, three or four replicates:
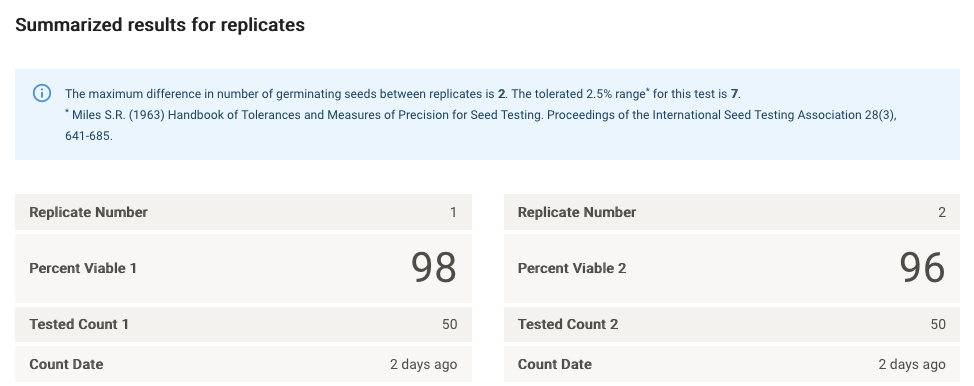
You can still make the final decision if the test is conclusive or inconclusive.
Please review the calculated test result details and remember to click the Save button before leaving the screen.

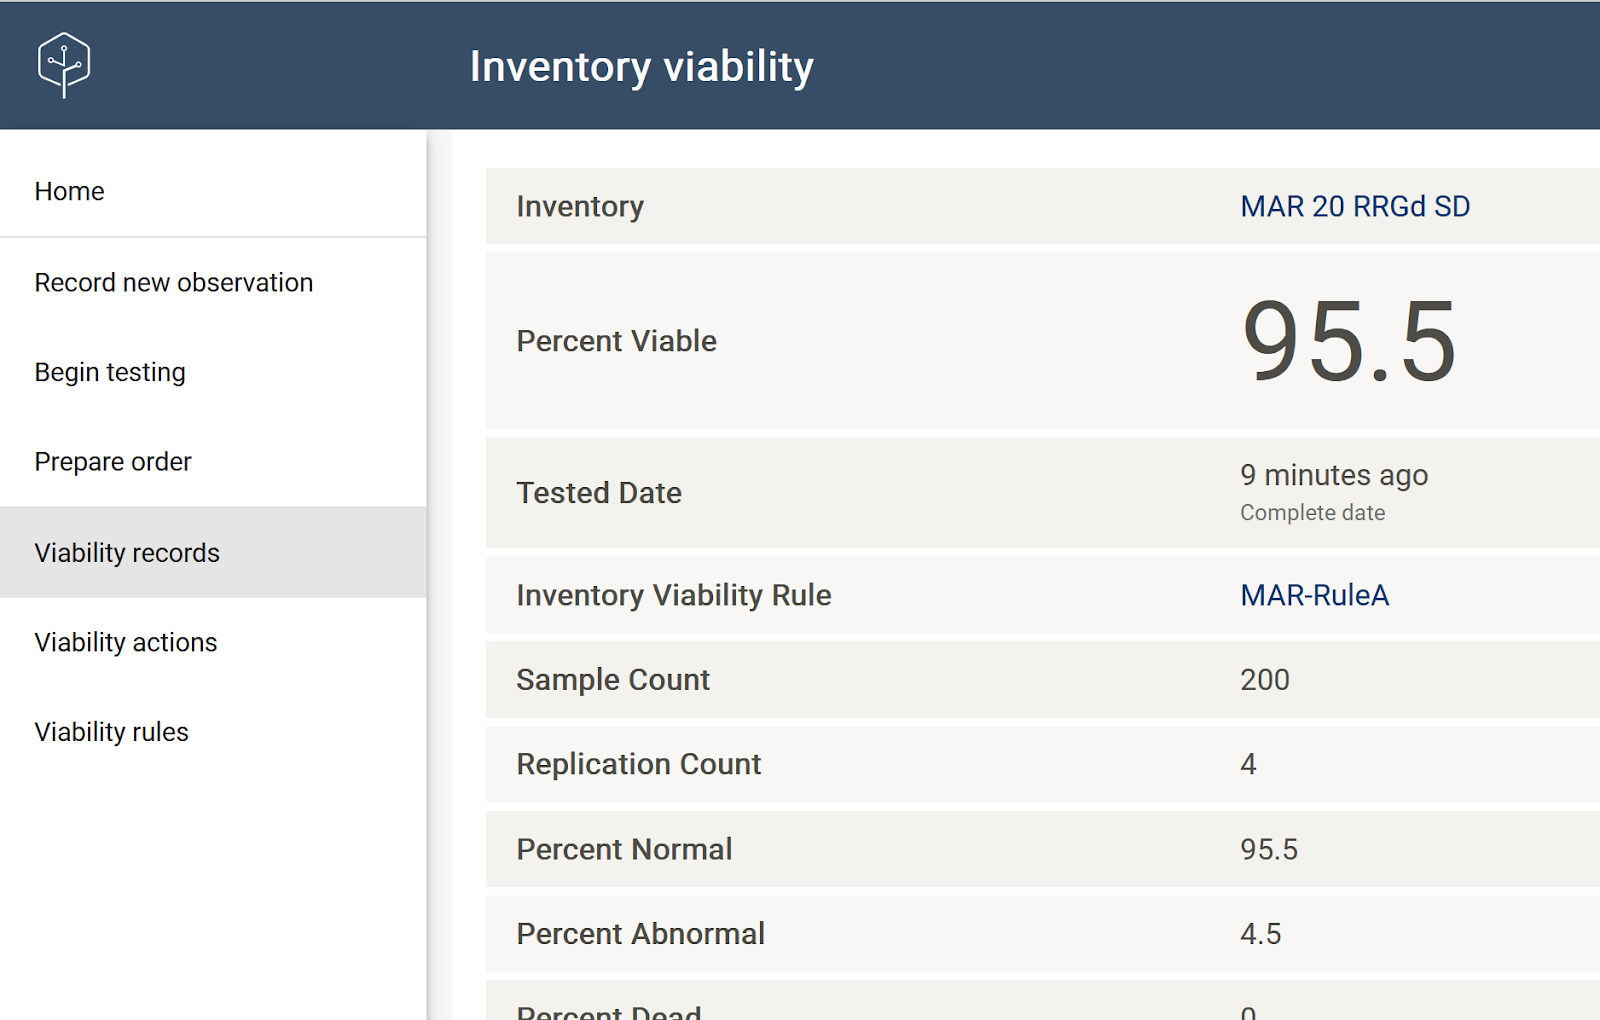
When the test has been successfully recorded, GGCE will display the Percent Viable in a large bold font:
On the Inventory menu, when you have selected a specific inventory item, you can review its viability data under the Viability tab:
