Single sign-on with Azure AD and Google
Single sign-on for GGCE allows users to authenticate with their existing user accounts in Azure AD, Google, Keycloak, Okta or any other OpenID Connect (OIDC/OAuth2) authorization service.
Most organizations require central user management for the applications in use. If you want to enable your staff to login to GGCE with their organizational accounts, then you’re reading the right document.
GGCE Server from 2026.1 uses /backend virtual path. Update the Redirect URL in your authentication provider accordingly!
Redirect URIs and Origins in this text are based on a GGCE running at https://staging.ggce.genesys-pgr.org. Please make note of the BASE_URL of your GGCE, including the https:// or http:// protocol now:
BASE_URL:
Azure Active Directory
To enable authentication with Azure AD you must first register GGCE as an App in Azure Active Directory using the Azure portal https://portal.azure.com. This will provide you with the Client ID to use with GGCE:

AZURE_CLIENT_ID:
You will need to then add Web application access under “Authentication” and set up a Client secret under “Certificates & Secrets” as described below.
Register web application access
Under “Authentication” click “Add platform” and add a Web application. You will be prompted for a Redirect URI.
The GGCE redirect URI follows the {BASE_URL}/backend/login/oauth2/code/{registrationId} pattern. We will use azure as the client registrationId, therefore the Redirect URI of your GGCE for Azure is:

Redirect URI: /backend/login/oauth2/code/azure
You can add additional redirect URIs (e.g. for development) if required.
Generate a client secret
Under “Certificates & Secrets” create a new Client secret. This will generate a new combination of Client ID and Secret. Note that the secret will be displayed only once immediately after it being generated:

Make sure to copy it to a secure place or note it down here:
AZURE_CLIENT_SECRET:
Configuring GGCE for Azure AD
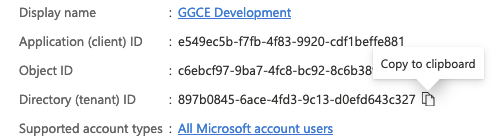
The last piece of information is the Tenant ID listed under “Directory (tenant) ID” in the “Overview” of your Azure App registration page, just below the Application Client ID:
Logins with Azure can now be enabled by setting the following environment variables:
OAUTH2_AUTHORIZATION=azure
OAUTH2_AUTHORIZATION_AZURE_CLIENT_ID=xxxx
OAUTH2_AUTHORIZATION_AZURE_CLIENT_SECRET=xxxx
OAUTH2_AUTHORIZATION_AZURE_TENANT_ID=xxxx
… and starting GGCE Server. The option to log in with “Microsoft” will be available on the GGCE login screen.
Additional configuration options
GGCE login screen will display the Azure login option as “Microsoft” by default. You can change this label by setting the OAUTH2_AUTHORIZATION_AZURE_CLIENT_NAME to another value, preferably to:
OAUTH2_AUTHORIZATION_AZURE_CLIENT_NAME=Work or personal Microsoft account
Sign in with Google
Similarly, you can obtain Client ID and Secret from Google at https://console.cloud.google.com by registering a new Project and generating OAuth 2.0 Client IDs for a Web application. You need to specify the HTTP origin of your GGCE Server, i.e. its BASE_URL:

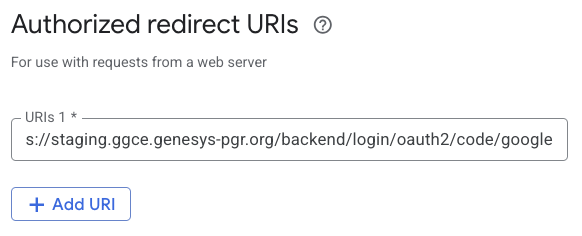
The GGCE redirect URI follows the {BASE_URL}/backend/login/oauth2/code/{registrationId} pattern. We will use google as the client registrationId, therefore the Redirect URI of your GGCE for Google is:
Redirect URI: /backend/login/oauth2/code/google
You can add additional redirect URIs or origins (e.g. for development) later, if required:
Hit “Save” and note the Client ID and Secret generated by Google:
GOOGLE_CLIENT_ID:
GOOGLE_CLIENT_SECRET:
Login with Google accounts can now be enabled by setting the following environment variables:
OAUTH2_AUTHORIZATION=google
OAUTH2_AUTHORIZATION_GOOGLE_CLIENT_ID=xxxx
OAUTH2_AUTHORIZATION_GOOGLE_CLIENT_SECRET=xxxx
… and starting GGCE Server. The option to log in with “Google” will be available on the GGCE login screen.
Additional configuration options
GGCE login screen will display the Google login option as “Google”. You can change this label by setting the OAUTH2_AUTHORIZATION_GOOGLE_CLIENT_NAME to another value.
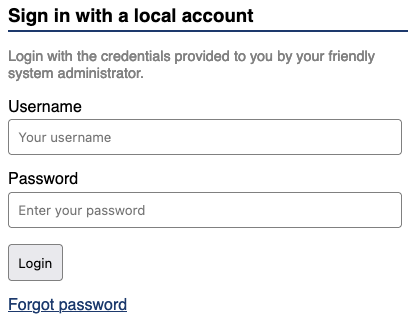
Disable form login
The login form still allows users to log in with their GGCE credentials:
This can be disabled with:
ALLOW_LOCAL_LOGIN=false
With local account login disabled, users can login to GGCE only through Azure or Google.
The SOAP web services will still accept the user’s GGCE credentials for compatibility with the Curator Tool as it only supports authentication with a username and a password.
Users that normally login with Azure should request a “Password reset” in GGCE and set a custom password for use with the Curator Tool.
Multiple authorization servers
Multiple authorization configurations can be enabled at the same time by listing their registration IDs in OAUTH2_AUTHORIZATION separated by a comma as shown below:
OAUTH2_AUTHORIZATION=azure,google
OAUTH2_AUTHORIZATION_AZURE_CLIENT_ID=xxxx
OAUTH2_AUTHORIZATION_AZURE_CLIENT_SECRET=xxxx
OAUTH2_AUTHORIZATION_AZURE_TENANT_ID=xxxx
OAUTH2_AUTHORIZATION_GOOGLE_CLIENT_ID=xxxx
OAUTH2_AUTHORIZATION_GOOGLE_CLIENT_SECRET=xxxx
Manual configuration
Each registration must use a simple keyword of letters and digits as the registrationId. It is used to uniquely identify the appropriate registration in GGCE when the service redirects the user to the specified Redirect URI after successful login. In this text we used two registration IDs that GGCE recognizes and automatically configures with known good settings: azure and google.
We specified only the two options for Google:
OAUTH2_AUTHORIZATION_GOOGLE_CLIENT_ID=xxxx
OAUTH2_AUTHORIZATION_GOOGLE_CLIENT_SECRET=xxxx
The following known working default values are automatically applied by GGCE when left blank:
OAUTH2_AUTHORIZATION_GOOGLE_CLIENT_NAME=Google
OAUTH2_AUTHORIZATION_GOOGLE_SCOPE=openid,profile,email,address,phone
OAUTH2_AUTHORIZATION_GOOGLE_USERNAME_ATTRIBUTE=email
OAUTH2_AUTHORIZATION_GOOGLE_ISSUER_URI=https://accounts.google.com
OAUTH2_AUTHORIZATION_GOOGLE_AUTHORIZATION_URI=https://accounts.google.com/o/oauth2/v2/auth
OAUTH2_AUTHORIZATION_GOOGLE_TOKEN_URI=https://www.googleapis.com/oauth2/v4/token
OAUTH2_AUTHORIZATION_GOOGLE_USER_INFO_URI=https://www.googleapis.com/oauth2/v3/userinfo
OAUTH2_AUTHORIZATION_GOOGLE_JWK_SET_URI=https://www.googleapis.com/oauth2/v3/certs
Any other OIDC server may be configured and you will need to specify all of the configuration settings as shown above in the Google example and in the form below.
Start by selecting a simple unique keyword of letters and digits as the registrationId. All remaining configuration settings are provided by the service. The issuer, authorization, token, and other URIs are usually provided by the service at .well-known/openid-configuration URL (try googling it for your provider).
Registration ID:               (Pick a simple unique keyword of letters and digits.)
Client ID:
Client secret:
OIDC scope:
Username attribute:
Issuer URI:
Authorization URI:
Token endpoint URI:
User info endpoint URI:
JWK set URI:
There are two settings that are not provided by the login service: the Client Name that is displayed on the GGCE login screen and the Username Attribute.
The Username Attribute determines which OIDC token claim will be used as the “username” in GGCE. For Google and Azure we used email, but you are free to pick another claim attribute (e.g. preferred_username or sub).
Register the configuration using environment variables:
OAUTH2_AUTHORIZATION=keycloak
OAUTH2_AUTHORIZATION_KEYCLOAK_CLIENT_ID=xxxx
OAUTH2_AUTHORIZATION_KEYCLOAK_CLIENT_SECRET=xxxx
OAUTH2_AUTHORIZATION_KEYCLOAK_CLIENT_NAME=Keycloak
OAUTH2_AUTHORIZATION_KEYCLOAK_SCOPE=openid,profile,email,address,phone
OAUTH2_AUTHORIZATION_KEYCLOAK_USERNAME_ATTRIBUTE=email
OAUTH2_AUTHORIZATION_KEYCLOAK_ISSUER_URI=https://…
OAUTH2_AUTHORIZATION_KEYCLOAK_AUTHORIZATION_URI=https://…
OAUTH2_AUTHORIZATION_KEYCLOAK_TOKEN_URI=https://…
OAUTH2_AUTHORIZATION_KEYCLOAK_USER_INFO_URI=https://…
OAUTH2_AUTHORIZATION_KEYCLOAK_JWK_SET_URI=https://…
Docker compose file
In the Docker compose file the environment variables can be defined as follows:
  environment:
    OAUTH2_AUTHORIZATION: azure
    OAUTH2_AUTHORIZATION_AZURE_CLIENT_ID: xxxx
    OAUTH2_AUTHORIZATION_AZURE_CLIENT_SECRET: xxxx
    OAUTH2_AUTHORIZATION_AZURE_TENANT_ID: xxxx
… or alternatively as:
  environment:
    - OAUTH2_AUTHORIZATION=azure
    - OAUTH2_AUTHORIZATION_AZURE_CLIENT_ID=xxxx
    - OAUTH2_AUTHORIZATION_AZURE_CLIENT_SECRET=xxxx
    - OAUTH2_AUTHORIZATION_AZURE_TENANT_ID=xxxx